<?xml version="1.0" encoding="utf-8"?><feed xmlns="http://www.w3.org/2005/Atom" ><generator uri="https://jekyllrb.com/" version="3.10.0">Jekyll</generator><link href="https://adamfendley.com/feed.xml" rel="self" type="application/atom+xml" /><link href="https://adamfendley.com/" rel="alternate" type="text/html" /><updated>2026-04-04T19:19:16+00:00</updated><id>https://adamfendley.com/feed.xml</id><title type="html">Adam Fendley</title><subtitle>Adam&apos;s personal website</subtitle><entry><title type="html">Building Our Custom Wedding Website</title><link href="https://adamfendley.com/2026/04/04/building-our-custom-wedding-website.html" rel="alternate" type="text/html" title="Building Our Custom Wedding Website" /><published>2026-04-04T00:00:00+00:00</published><updated>2026-04-04T00:00:00+00:00</updated><id>https://adamfendley.com/2026/04/04/building-our-custom-wedding-website</id><content type="html" xml:base="https://adamfendley.com/2026/04/04/building-our-custom-wedding-website.html"><![CDATA[<p>My partner and I recently got married! We feel incredibly grateful that everything went nearly perfectly, and we are really enjoying this new chapter in our lives together.</p>

<p>This post is about something that’s usually a minor detail in most people’s wedding planning, but became a bit more of an adventure in ours – the wedding website.</p>

<p>Like almost everything about our wedding day, we ended up having strong opinions about how our website should look and work. Although there are of course many platforms that tailor to this industry, I couldn’t pass up the opportunity to build our vision into reality from scratch. I ended up creating a fully custom wedding website with QR-code authentication, RSVP tracking, a purpose-built gift registry experience, and production-grade monitoring – because I couldn’t help myself.</p>

<p><em>Note: for our privacy I’ve replaced the photos, names, and details in the website screenshots throughout this post.</em></p>

<h2 id="the-vision">The Vision</h2>

<p>At the end of the day, we had three specific requirements that I designed towards:</p>

<h3 id="professional-and-consistent-feel">Professional and Consistent Feel</h3>

<p>Almost every aspect of a wedding can be obsessed over and tweaked to the couple’s satisfaction, but the website is frequently not among these details. I personally was willing to spend more time and money to have a website experience free of advertisements, unwanted links and logos, or unchangeable components that could detract from the guest’s experience.</p>

<p><a class="float-left" href="/assets/img/wedding/registry.png" data-lightbox="registry">
    <img src="/assets/img/wedding/registry.png" alt="Screenshot of the wedding website's registry page, showing multiple purchasable items such as checked bags, taxi fares, dinner for two, and a night at a hotel." />
</a></p>

<p>I find that this is especially true when dealing with an online Gift Registry, which often bounces guests through multiple other websites and can be confusing to navigate. A lot of wedding websites will also have a general Cash Fund option in their registry implementation, but our vision was to be more specific and allow our guests to choose exactly what experience they were contributing cash to, if they chose to do so. We felt that this created a much more satisfying and intimate gift giving experience, even if the end result is still just giving cash.</p>

<p>Obviously, building a website from scratch isn’t the <em>only</em> way to achieve this goal of consistency in design and experience, but for me having complete control over every minor aspect of the site was a benefit that I was glad came along with that choice.</p>

<h3 id="privacy">Privacy</h3>

<p>Our wedding day and the surrounding details are uniquely personal. I find it quite jarring that many couples’ wedding websites are left open to the world, with details of where and when the events are taking place, and maybe even an intimate writeup of the couple’s history together.</p>

<p>Protecting these details matters a lot to me. The simplest approach is password-protecting the site, but that introduces usability issues. For example, what if someone loses their invitation with the password? Or if using a password which is supposed to be common knowledge about the couple, how can you guarantee the recipient will know that piece of trivia to use to gain access to the website?</p>

<p>By contrast, we wanted our wedding details to be very secure and only accessible to those who had received an invite, not just anyone who knew a thing or two about us, and certainly not by everyone on the internet. At the same time, we wanted to avoid any technical challenges this would place on our guests. There are probably some wedding website platforms which have sufficiently solved this problem for their users, but if so, I haven’t personally seen it yet.</p>

<p>I wanted to achieve a simple but secure mechanism for accessing the website, that didn’t feel like a burden or afterthought to guests.</p>

<h3 id="customized-invitations-and-ease">Customized Invitations and Ease</h3>

<p><a class="float-left" href="/assets/img/wedding/rsvp-qr.png" data-lightbox="rsvp-qr">
    <img src="/assets/img/wedding/rsvp-qr.png" alt="Photo of an insert into the wedding invitation that says 'RSVP by August 15th' and contains a QR code to scan to access the wedding website." />
</a></p>

<p>
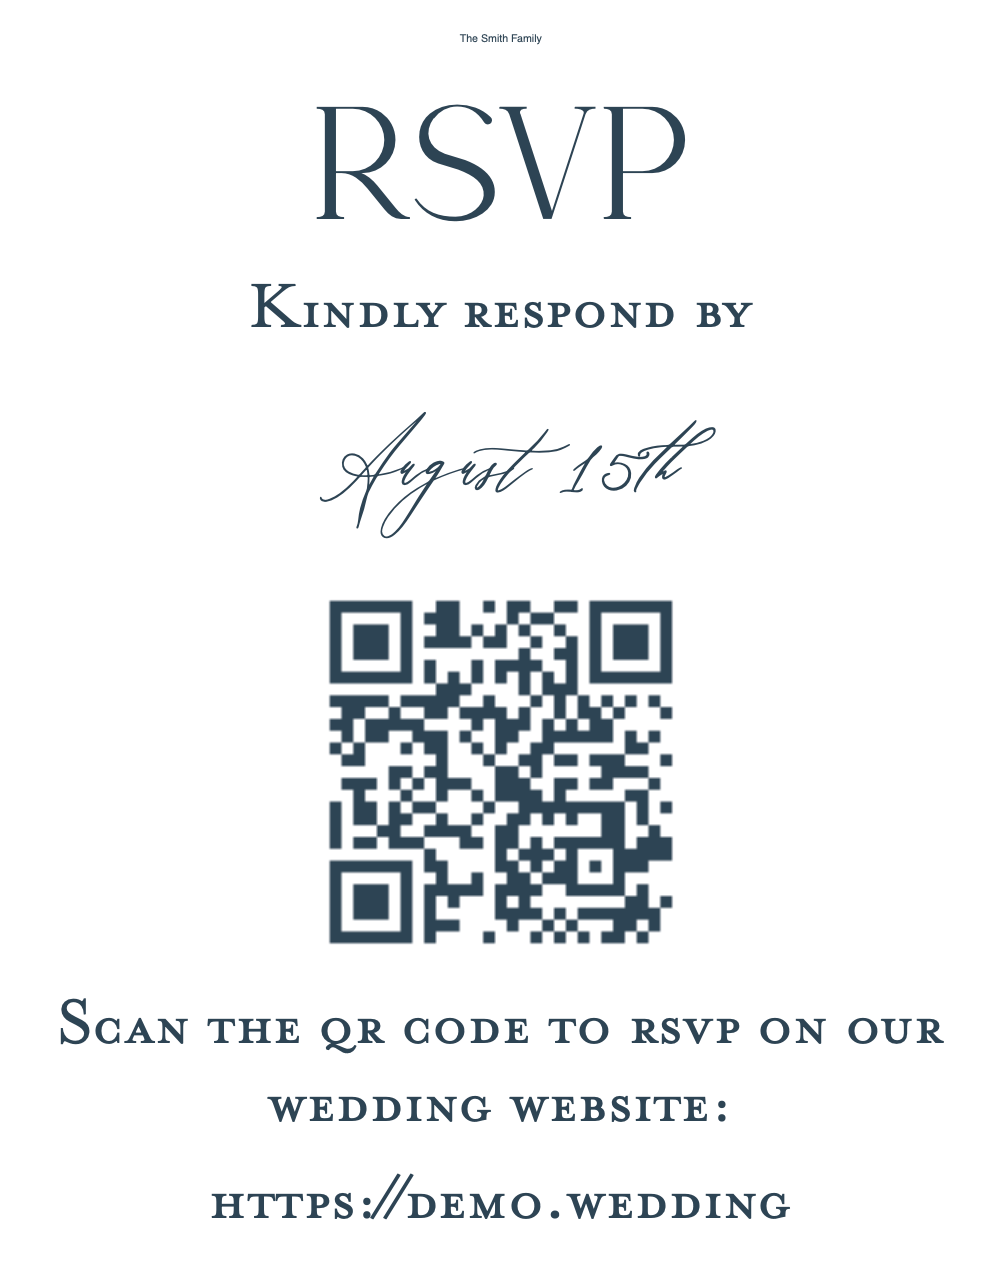
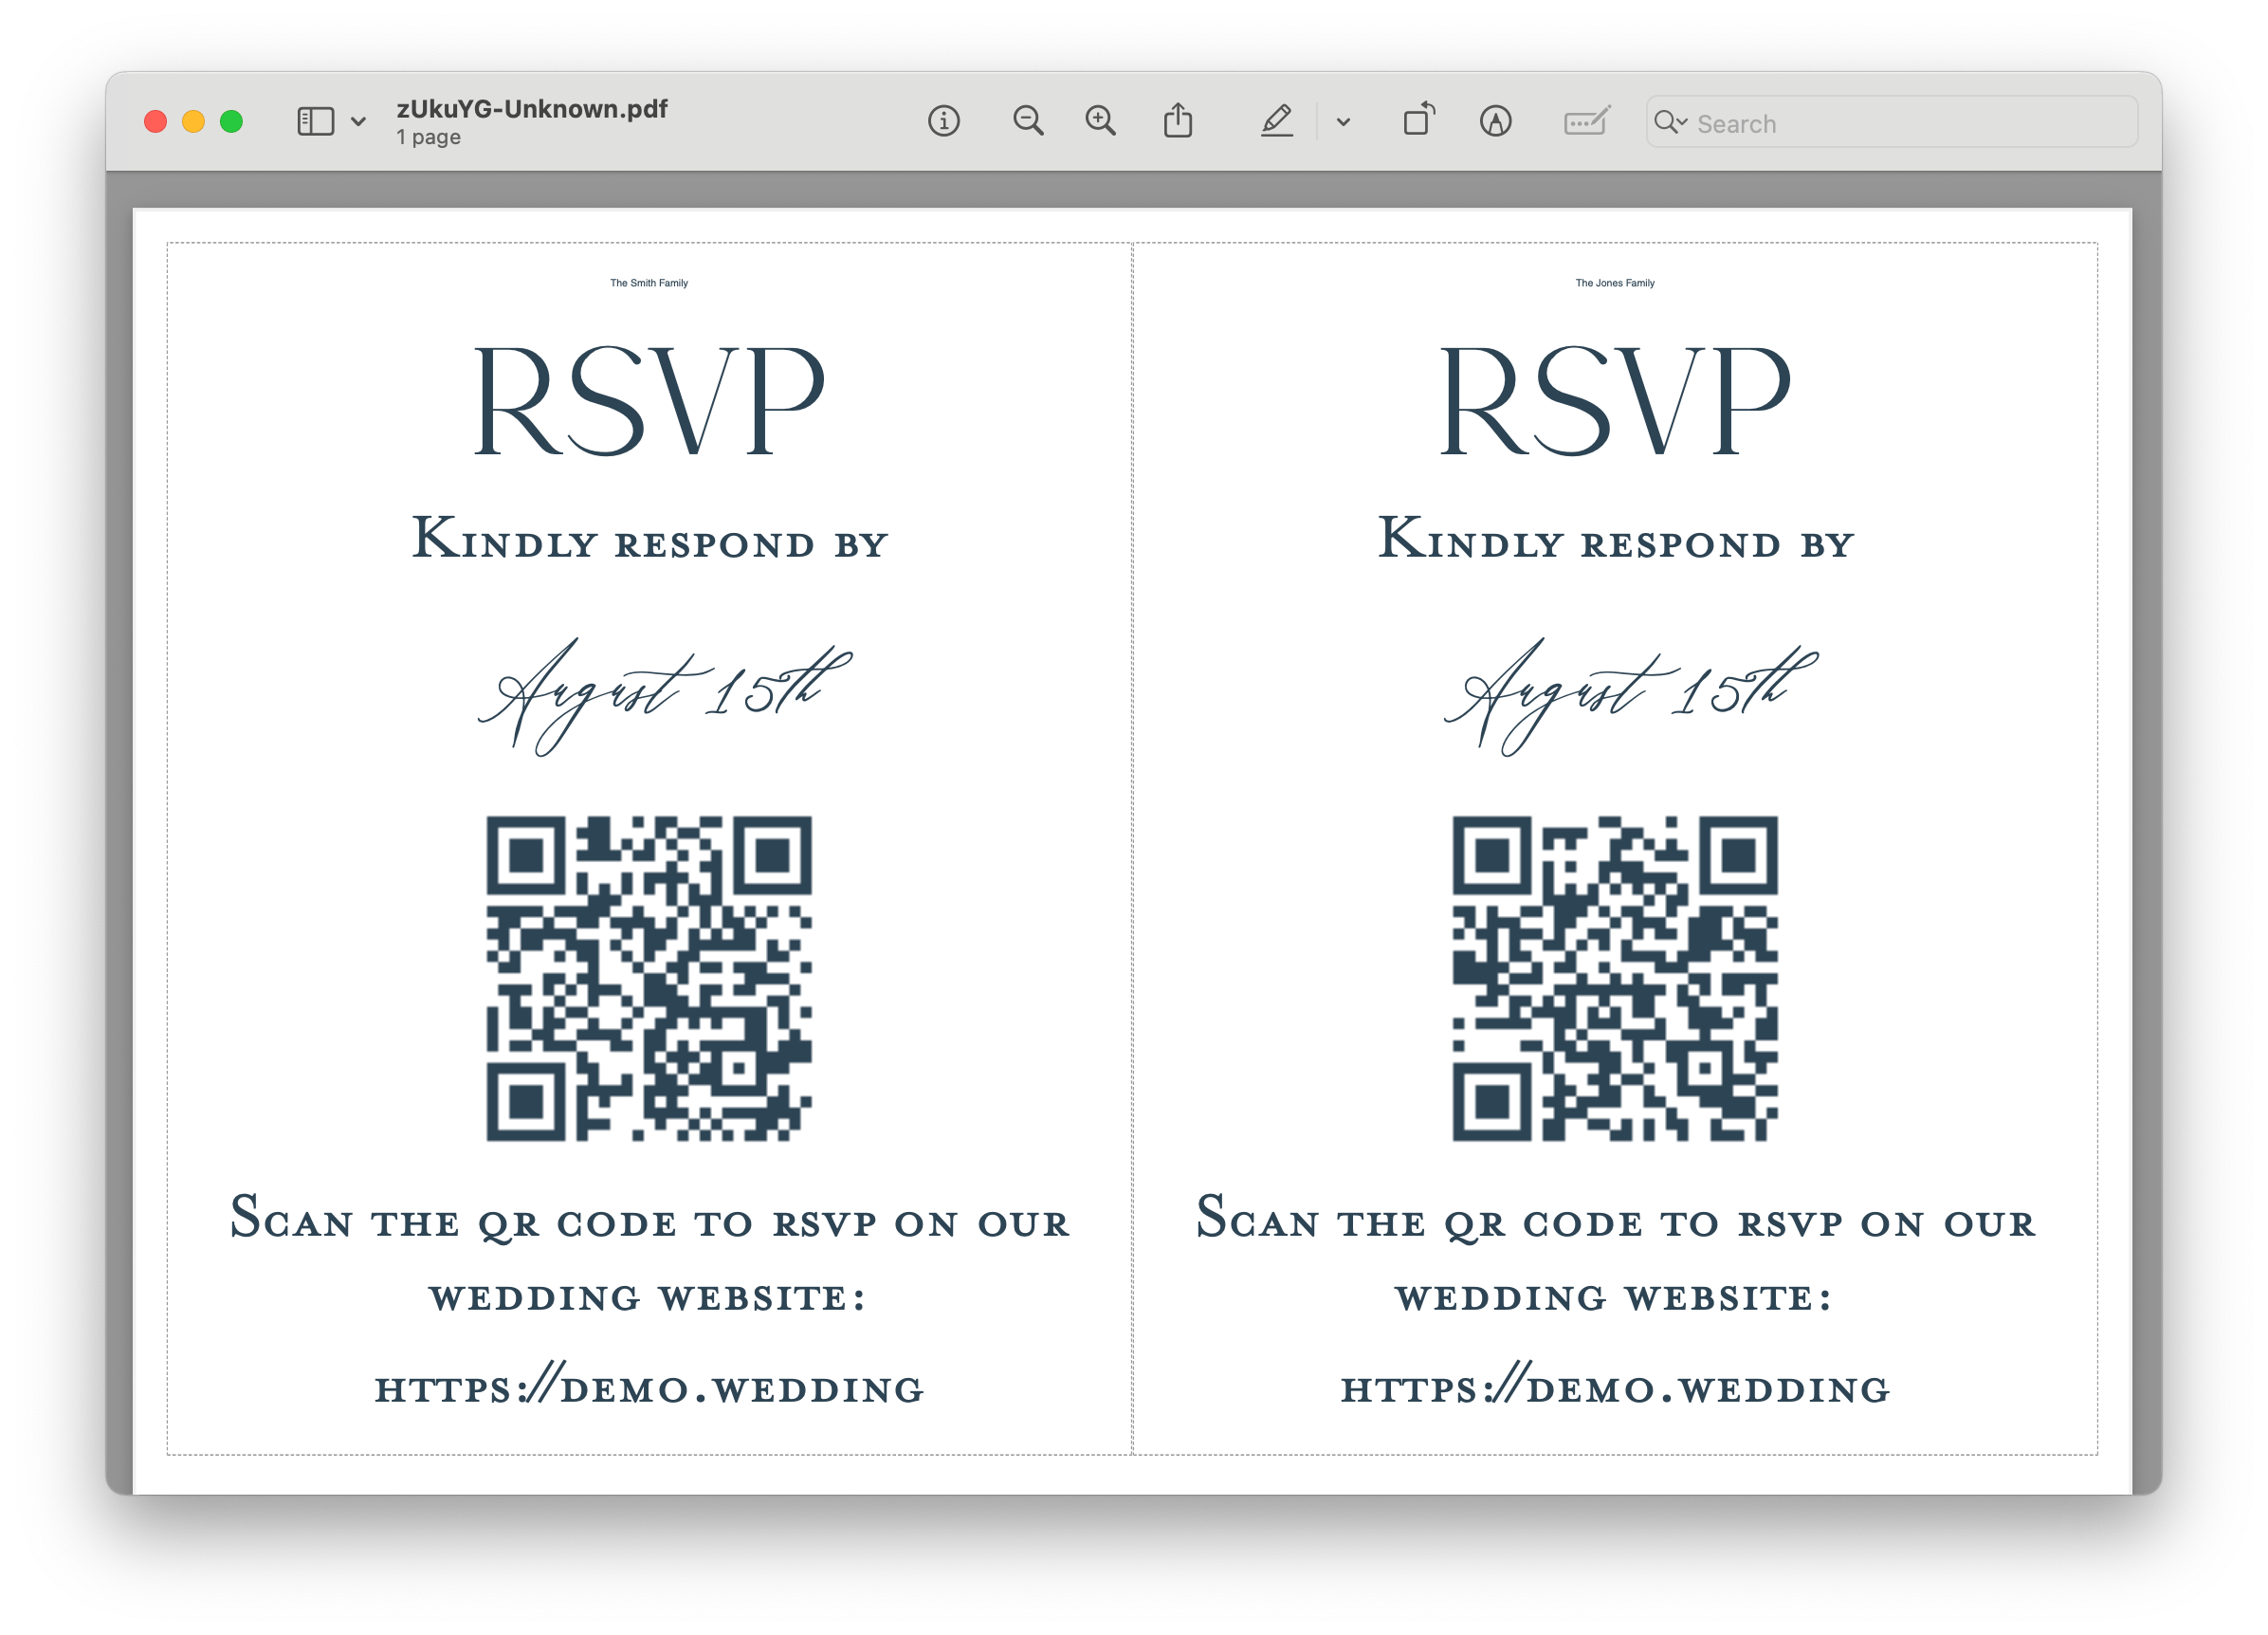
We decided to have each invitation come with a unique QR code that the recipient could use to quickly access the website and be authenticated <strong><em>as them</em></strong> in order to get more details about the wedding day and to RSVP.</p>

<p>The QR code embedded authentication info for the recipient of the invitation, and when scanned would instantly log them in to the site without any need for a password. However, when considering the breadth of background and age groups who would be receiving the invitation, I knew some people would be much more comfortable logging in to the website on a desktop computer rather than RSVP’ing from their phone.</p>

<div class="clear" />

<p>With this in mind I built a secondary authentication mechanism if someone didn’t come from a scanned QR code:</p>

<p><a href="/assets/img/wedding/login.png" data-lightbox="login">
    <img src="/assets/img/wedding/login.png" alt="Home page of the website in an unauthenticated state, contains a photo of the couple and a login box that has a 'Last name' field and a 'House number on your invitation' field with an 'Enter' button underneath." />
</a></p>

<p>Rather than relying on a password or “trivia check,” I wanted to allow invitees to access the website using something that would uniquely identify them, and something they (or at least those close to them) would know. I landed on a combination of using last name and house number, which makes it both easy to uniquely identify a household that had received an invitation, as well as <em>reasonably</em> difficult to guess someone’s log in information. I used just the house number, instead of the full address, since addresses can be written in multiple ways that would be hard to programmatically match (for example <code class="language-plaintext highlighter-rouge">123 Main St</code> vs. <code class="language-plaintext highlighter-rouge">123 Main Street</code>).</p>

<p>Obviously, many of the households invited to the wedding knew each other well enough to know each other’s street addresses, and as such would be able to log in as one another in theory, so I was assuming some basic level of best intentions from those who had received an invite not to try and do this.</p>

<p><a href="/assets/img/wedding/rsvp-cmd.png" data-lightbox="rsvp-cmd">
    <img class="tall-image" src="/assets/img/wedding/rsvp-cmd.png" alt="Photo of the same insert into the wedding invitation containing a QR code, however below the QR code is a monospaced textbox with pre-formatted curl commands that will RSVP the recipient and their plus-one to the wedding." />
</a></p>

<p>
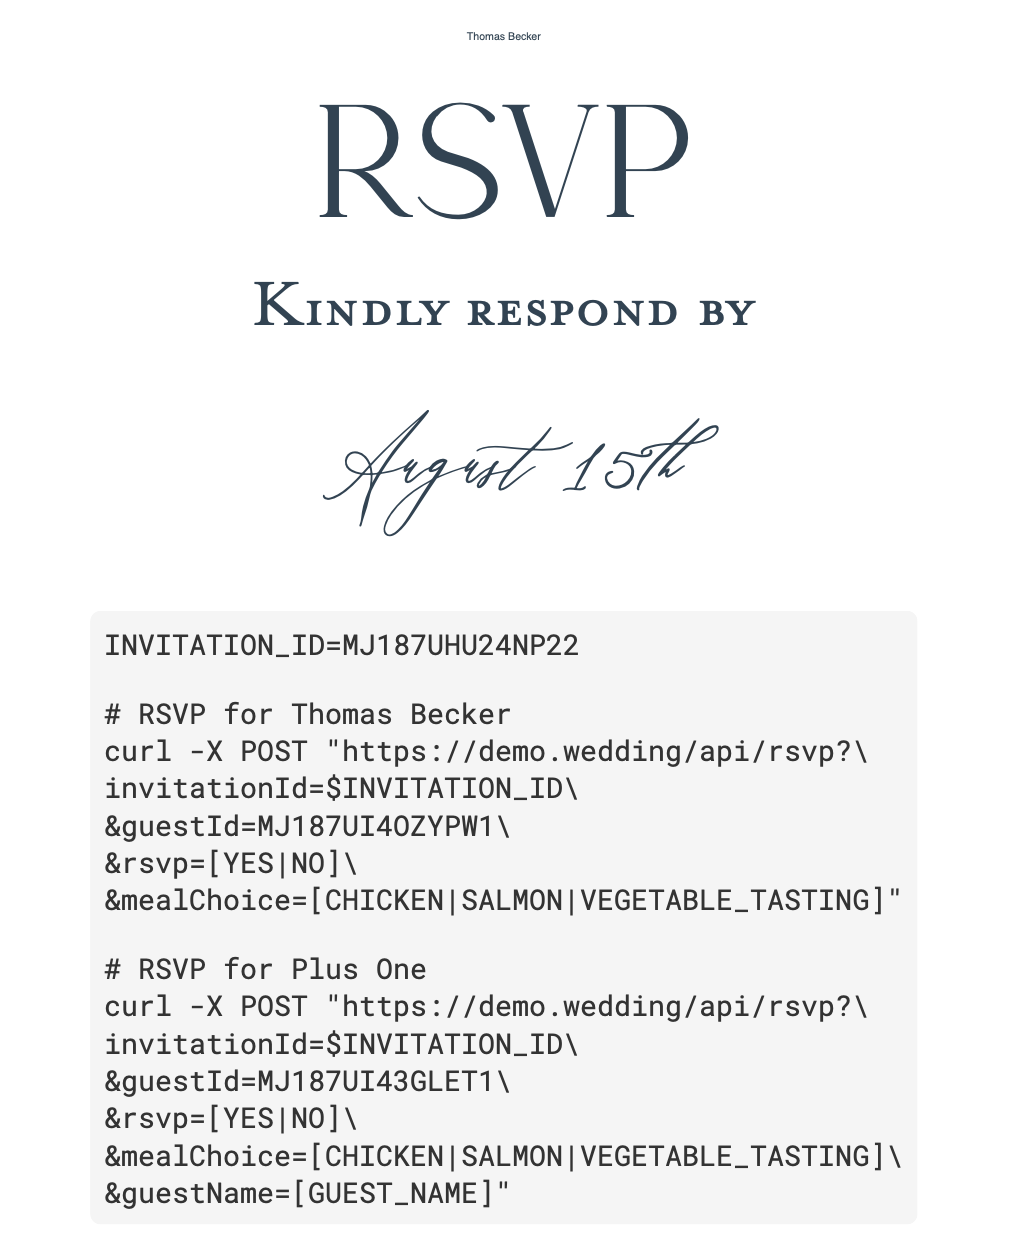
On the other side of the coin, a lot of my groomsmen and some guests were also software engineers, so for the technically-minded guests I wanted to lean even more into the bespoke nature of this website and make them go directly to the website’s API to submit their RSVP.</p>

<p>Why? Because imagining my friends receiving a formal wedding invitation in the mail and having to open up a terminal and run curl commands to RSVP to it brought a smile to my face, and isn’t that what this is all about?</p>

<h2 id="writing-software-is-my-love-language">Writing Software is my Love Language</h2>

<p>I could write a long explanation justifying why our specific requirements (and my curl-RSVP gag) warranted building this website from scratch instead of using one of the many platforms available for building wedding-focused websites, but that would just be rationalization. The truth is that I did this because I really wanted to, and because I knew it would be a unique and fun challenge that would result in an experience that’s very authentic to who I am.</p>

<p>One of the things my partner and I both love as guests in attendance at a wedding is when an aspect of the couple’s ceremony is quintessentially <em>them</em>. It is so delightful and memorable to see a small touch that speaks directly to who they are and what they value.</p>

<p>Authenticity is something we both tried to keep in mind a lot through the process of planning our wedding, and for me, this is one of those authentic things – being a software engineer is a big part of who I am and what I love to do. The reason I originally fell in love with programming, first as a hobby and then later as my career, is the satisfaction I get from crafting the perfect solution to a (sometimes incredibly niche) problem. Tinkering and building things using computers is a big part of my life, and I simply couldn’t say no to the delight and satisfaction this would bring me as part of our wedding planning process.</p>

<h2 id="how-its-made">How It’s Made</h2>

<p>The frontend of the website is built using React. I evaluated a bunch of React UI libraries and landed on <a href="https://www.chakra-ui.com">Chakra UI</a> because of the simple visual design, feature-richness and flexibility of its components. I am NOT a UI designer so I really needed all the help I could get to have a consistent and pleasing visual feel. I ended up being very pleased with Chakra and will definitely use it for more projects going forward.</p>

<p>Because the site is dynamic, it also needed a backend, which I built using TypeScript Lambda functions reading from and writing to DynamoDB. To cleanly communicate between the frontend and backend, I used <a href="https://github.com/colinhacks/zod">Zod</a> to model all the request and response objects, which allowed me to quickly formulate, validate, and process requests and responses sent between the client (i.e. frontend) and server, for example:</p>

<div class="language-ts highlighter-rouge"><div class="highlight"><pre class="highlight"><code><span class="k">export</span> <span class="kd">const</span> <span class="nx">RsvpRequestSchema</span> <span class="o">=</span> <span class="nx">z</span><span class="p">.</span><span class="nx">object</span><span class="p">({</span>
    <span class="na">invitationId</span><span class="p">:</span> <span class="nx">z</span><span class="p">.</span><span class="kr">string</span><span class="p">(),</span>
    <span class="na">invitationRsvp</span><span class="p">:</span> <span class="nx">z</span><span class="p">.</span><span class="nx">nativeEnum</span><span class="p">(</span><span class="nx">RSVP</span><span class="p">),</span>
    <span class="na">message</span><span class="p">:</span> <span class="nx">z</span><span class="p">.</span><span class="kr">string</span><span class="p">().</span><span class="nx">optional</span><span class="p">(),</span>
    <span class="na">guestRsvps</span><span class="p">:</span> <span class="nx">z</span><span class="p">.</span><span class="nx">array</span><span class="p">(</span><span class="nx">GuestRsvpSchema</span><span class="p">),</span>
<span class="p">}).</span><span class="nx">strict</span><span class="p">();</span>
<span class="k">export</span> <span class="kd">type</span> <span class="nx">RsvpRequest</span> <span class="o">=</span> <span class="nx">z</span><span class="p">.</span><span class="nx">infer</span><span class="o">&lt;</span><span class="k">typeof</span> <span class="nx">RsvpRequestSchema</span><span class="o">&gt;</span><span class="p">;</span>

<span class="k">export</span> <span class="kd">const</span> <span class="nx">RsvpResponseSchema</span> <span class="o">=</span> <span class="nx">z</span><span class="p">.</span><span class="nx">object</span><span class="p">({</span>
    <span class="na">error</span><span class="p">:</span> <span class="nx">z</span><span class="p">.</span><span class="kr">string</span><span class="p">().</span><span class="nx">optional</span><span class="p">(),</span>
    <span class="na">message</span><span class="p">:</span> <span class="nx">z</span><span class="p">.</span><span class="kr">string</span><span class="p">().</span><span class="nx">optional</span><span class="p">(),</span>
<span class="p">}).</span><span class="nx">strict</span><span class="p">();</span>
<span class="k">export</span> <span class="kd">type</span> <span class="nx">RsvpResponse</span> <span class="o">=</span> <span class="nx">z</span><span class="p">.</span><span class="nx">infer</span><span class="o">&lt;</span><span class="k">typeof</span> <span class="nx">RsvpResponseSchema</span><span class="o">&gt;</span><span class="p">;</span>
</code></pre></div></div>

<p>I was also really happy with my choice in Zod, which I had never worked with before but picked because it’s TypeScript-first. At work, we use <a href="https://smithy.io">Smithy</a> to model our APIs and generate client and server boilerplate code, but I felt that it was a bit overkill for this relatively simple project. Also, since the Smithy code generator is built in Java, I would need to pull in another build tool to use it. While I’m not always TypeScript’s biggest fan, I felt that being able to use one language across the entire project was a huge plus in simplifying things and accelerating development in this case.</p>

<p>The actual API was hosted on API Gateway, and both the API and the website were served using a CloudFront distribution which not only served the content quickly but also allowed me to easily add authentication logic to all of the access points. I used AWS’ <a href="https://docs.aws.amazon.com/cdk/v2/guide/home.html">Cloud Development Kit (CDK)</a> to model and deploy all of this infrastructure.</p>

<p>Below is a diagram of the complete architecture:</p>

<p><a href="/assets/img/wedding/architecture.drawio.png" data-lightbox="architecture">
    <img class="tall-image" src="/assets/img/wedding/architecture.drawio.png" alt="Architecture diagram of the wedding website built on top of AWS. Shows a user making requests to a CloudFront distribution, which returns website assets from S3 buckets, and sends API requests to API Gateway, backed by Lambda functions and DynamoDB. An event-bridge rule is also used to periodically invoke a canary lambda function to test the website." />
</a></p>

<p>
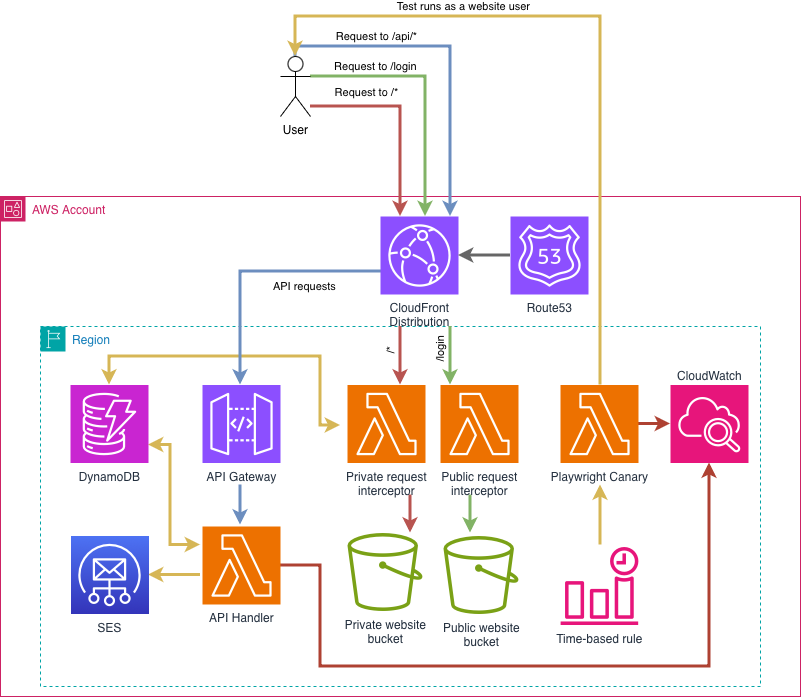
I was happy with all of these architectural choices, and the cost monthly was reasonable to me. Although a CDN does seem a bit extreme for this usecase, CloudFront cost me less than a dollar a month – the main expense was (as per usual) CloudWatch. I wasn’t willing to compromise on the number of metrics I had available to determine if something was going wrong, but damn do they really get you there. I’ll talk more about my overkill monitoring in just a bit.</p>

<h2 id="the-result">The Result</h2>

<h3 id="the-usual-stuff-and-getting-access-to-it">The usual stuff, and getting access to it</h3>

<p>
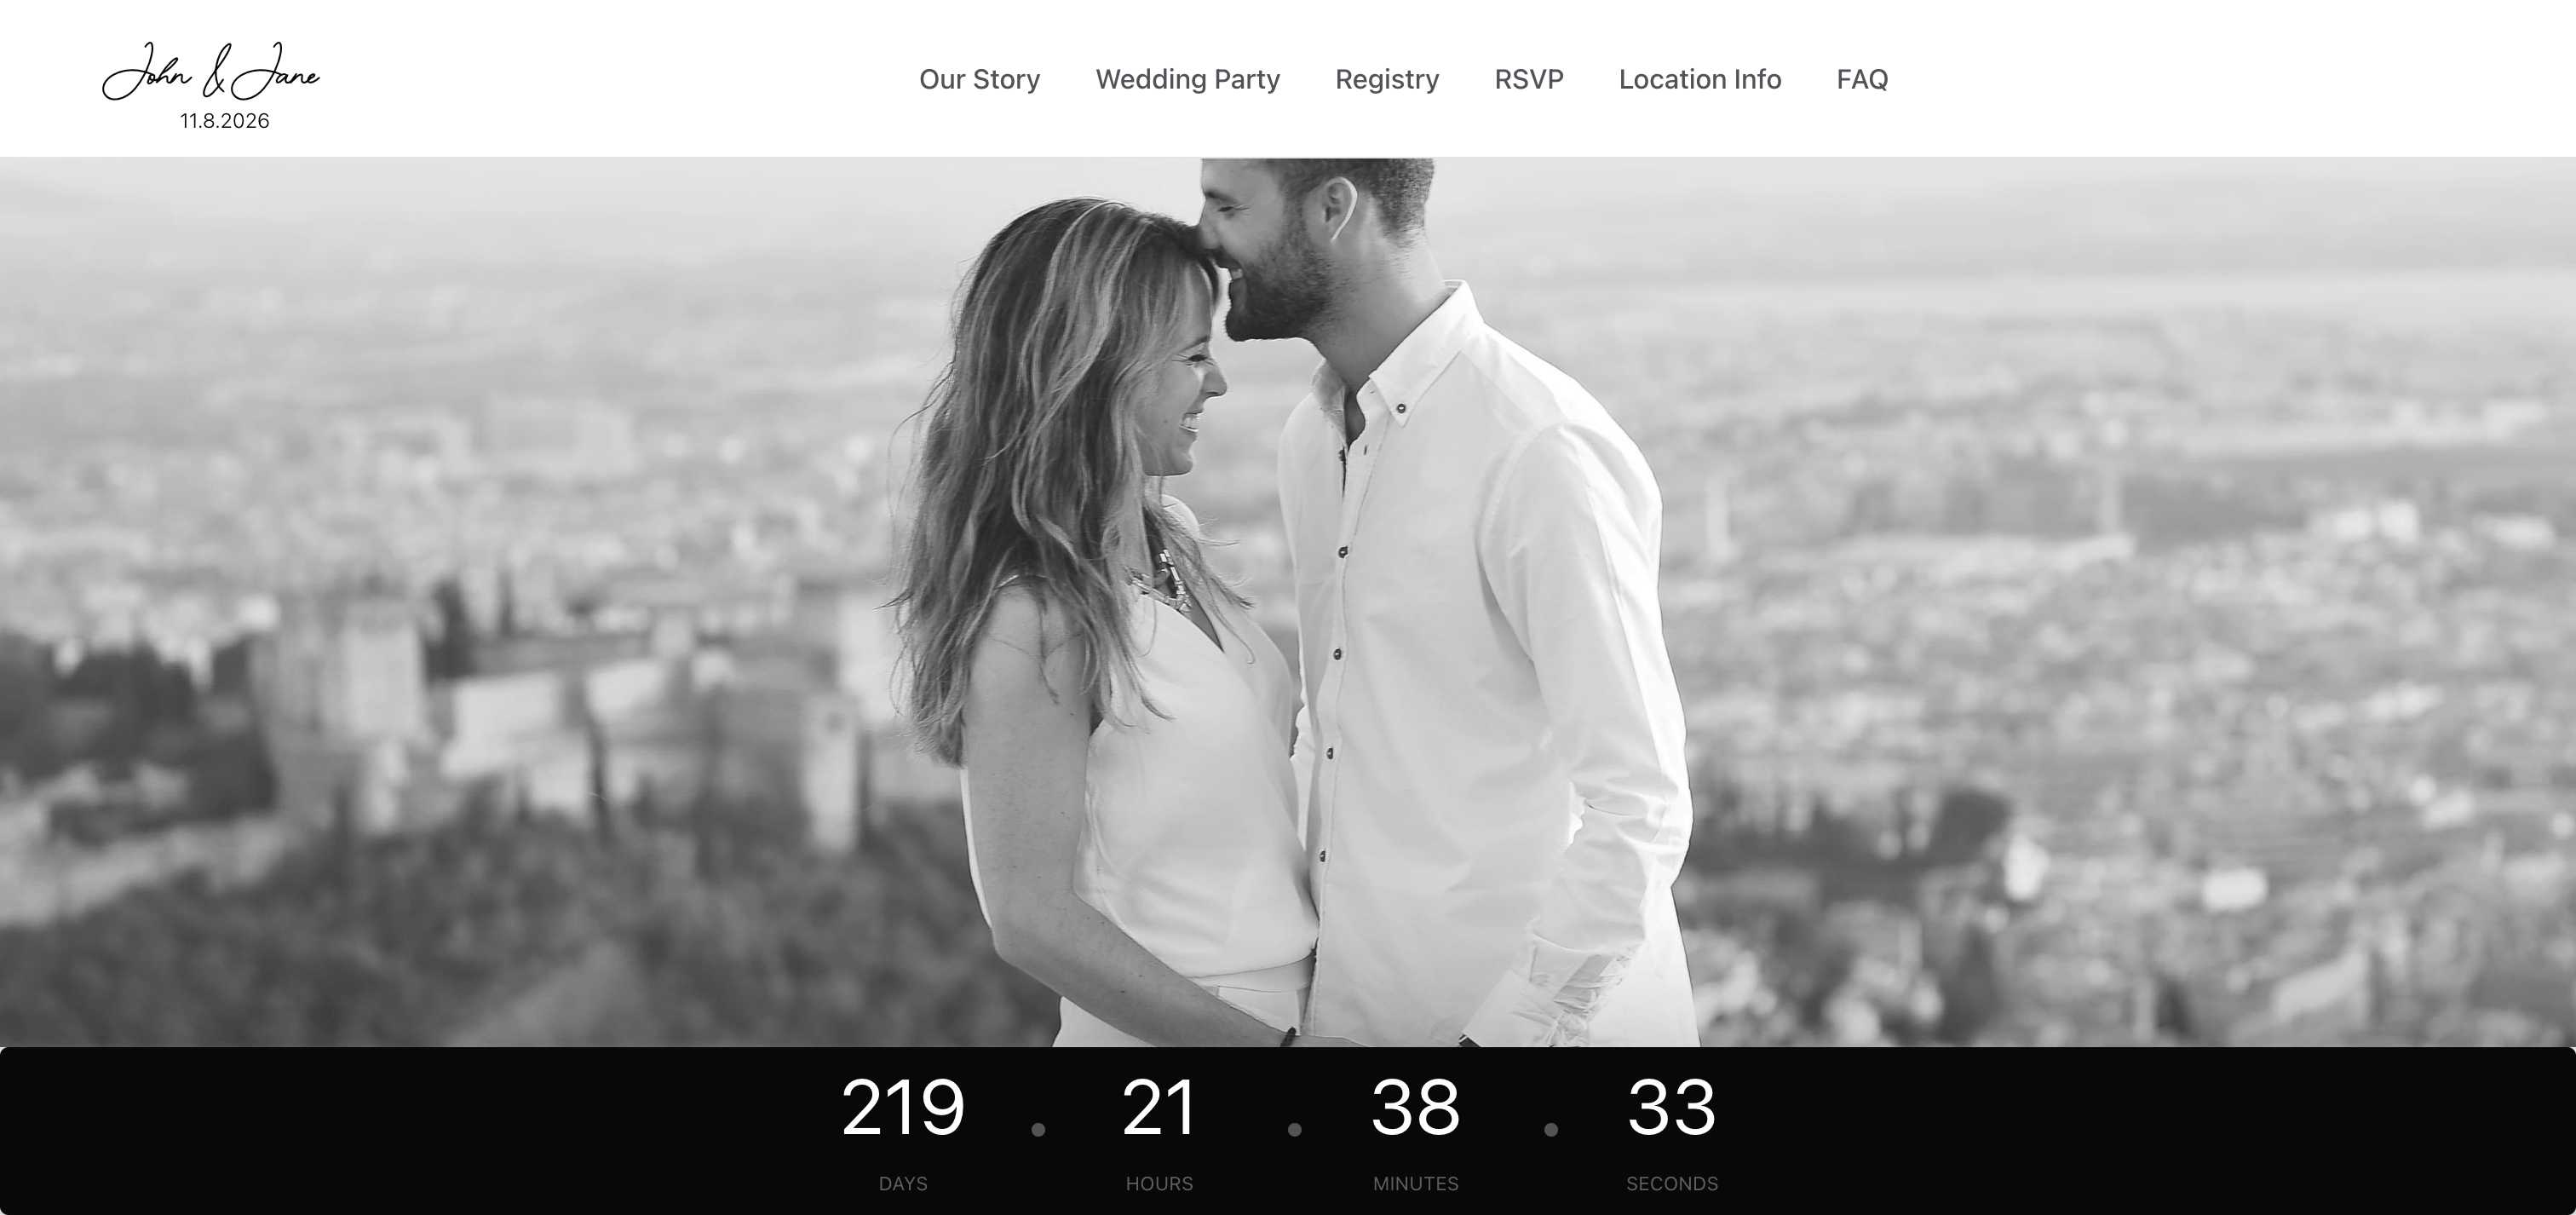
The website has all the standard pages you’d expect on any wedding website – a homepage with a countdown timer, a bit about my wife and I’s story, some info about the people in our wedding, a page with locations, times, and details, and an FAQ. All of this stuff isn’t really interesting from a technical perspective, but I did spend a lot of time making it just what we wanted, so I’m still proud of it.</p>

<div class="gallery">
  <div class="gallery-item">
    <a href="/assets/img/wedding/home.png" data-lightbox="gallery">
      <img src="/assets/img/wedding/home.png" alt="The homepage of the website once authenticated, shows a photo of the couple and a countdown timer to the wedding day." />
    </a>
    <div class="desc">Home page</div>
  </div>
  <div class="gallery-item">
    <a href="/assets/img/wedding/location.png" data-lightbox="gallery">
      <img src="/assets/img/wedding/location.cropped.png" alt="The 'Location' page of the website, shows information about the venue, the wedding day schedule, transportation and lodging options, and things to do while in town." />
    </a>
    <div class="desc">Location and day-of info</div>
  </div>
  <div class="gallery-item">
    <a href="/assets/img/wedding/story.png" data-lightbox="gallery">
      <img src="/assets/img/wedding/story.cropped.png" alt="The 'Our Story' page of the website, shows photos of the couple and lorem ipsum text in place of a narrative of how they met and got engaged." />
    </a>
    <div class="desc">Our Story</div>
  </div>
  <div class="gallery-item">
    <a href="/assets/img/wedding/party.png" data-lightbox="gallery">
      <img src="/assets/img/wedding/party.cropped.png" alt="The 'Wedding Party' page of the website, shows profile pictures of the maid of honor and bridesmaids, and the best man and groomsmen." />
    </a>
    <div class="desc">The Wedding Party</div>
  </div>
  <div class="gallery-item">
    <a href="/assets/img/wedding/faq.png" data-lightbox="gallery">
      <img src="/assets/img/wedding/faq.cropped.png" alt="The FAQ page of the website, shows questions and answers such as 'When is the RSVP deadline' and 'Can I bring a guest' along with lorem ipsum responses to each." />
    </a>
    <div class="desc">FAQ Page</div>
  </div>
</div>

<p>As mentioned earlier, I wanted to tightly control access to all of this information. While a simple password would have sufficed, I was afraid that it would be easily lost, locking guests out of the website. Also, I wanted the ability to identify <em>who</em> was accessing the website for the more custom functionality discussed later, not just to verify that they should be authorized to access it. So I built my own authentication mechanism. In fact, I built two of them.</p>

<h4 id="authentication">Authentication</h4>

<p>I decided that I needed two mechanisms by which guests could access our website. One for guests who received our invitations to simply scan the included QR code and instantly be authenticated and granted access, and another in case guests wanted to log in on a device other than a mobile phone with access to a camera – this latter one could also double as a backup mechanism in case they lost their invitation.</p>

<p>For each household receiving an invitation, I created an entry in our DynamoDB table. For example, an invitation could be represented as:</p>

<div class="language-json highlighter-rouge"><div class="highlight"><pre class="highlight"><code><span class="p">{</span><span class="w">
 </span><span class="nl">"InvitationId"</span><span class="p">:</span><span class="w"> </span><span class="s2">"ABCD1234"</span><span class="p">,</span><span class="w">
 </span><span class="nl">"InvitationName"</span><span class="p">:</span><span class="w"> </span><span class="s2">"Mr and Mrs John and Jane Smith"</span><span class="p">,</span><span class="w">
 </span><span class="nl">"Address"</span><span class="p">:</span><span class="w"> </span><span class="s2">"123 Example Way Leesburg, VA 20176"</span><span class="p">,</span><span class="w">
 </span><span class="nl">"HouseNumber"</span><span class="p">:</span><span class="w"> </span><span class="s2">"123"</span><span class="p">,</span><span class="w">
 </span><span class="nl">"LastNameLowercase"</span><span class="p">:</span><span class="w"> </span><span class="s2">"smith"</span><span class="p">,</span><span class="w">
 </span><span class="nl">"LoginCount"</span><span class="p">:</span><span class="w"> </span><span class="mi">0</span><span class="p">,</span><span class="w">
 </span><span class="nl">"RsvpChangeCount"</span><span class="p">:</span><span class="w"> </span><span class="mi">0</span><span class="p">,</span><span class="w">
 </span><span class="nl">"Version"</span><span class="p">:</span><span class="w"> </span><span class="mi">0</span><span class="w">
</span><span class="p">}</span><span class="w">
</span></code></pre></div></div>

<p>For the easy QR code access mechanism, I encoded the unique <code class="language-plaintext highlighter-rouge">InvitationId</code> into the URL in the code, for example:</p>

<div class="language-plaintext highlighter-rouge"><div class="highlight"><pre class="highlight"><code>https://demo.wedding/rsvp?invitationId=ABCD1234
</code></pre></div></div>

<p>When the user scans the QR code, the request to <code class="language-plaintext highlighter-rouge">/rsvp</code> is intercepted by a <a href="https://docs.aws.amazon.com/AmazonCloudFront/latest/DeveloperGuide/lambda-at-the-edge.html">Lambda@Edge</a> function. The interceptor queries DynamoDB for the provided <code class="language-plaintext highlighter-rouge">invitationId</code>, and if it is able to find it, logs the user in and stores a session cookie in their browser, allowing them access to the website. The result is a seamless experience where the user is uniquely authenticated and doesn’t even realize it’s happened.</p>

<p><img src="/assets/img/wedding/login-box.png" alt="A zoomed-in image showing the login box seen earlier in the unauthenticated login page." class="float-left" /></p>

<p>
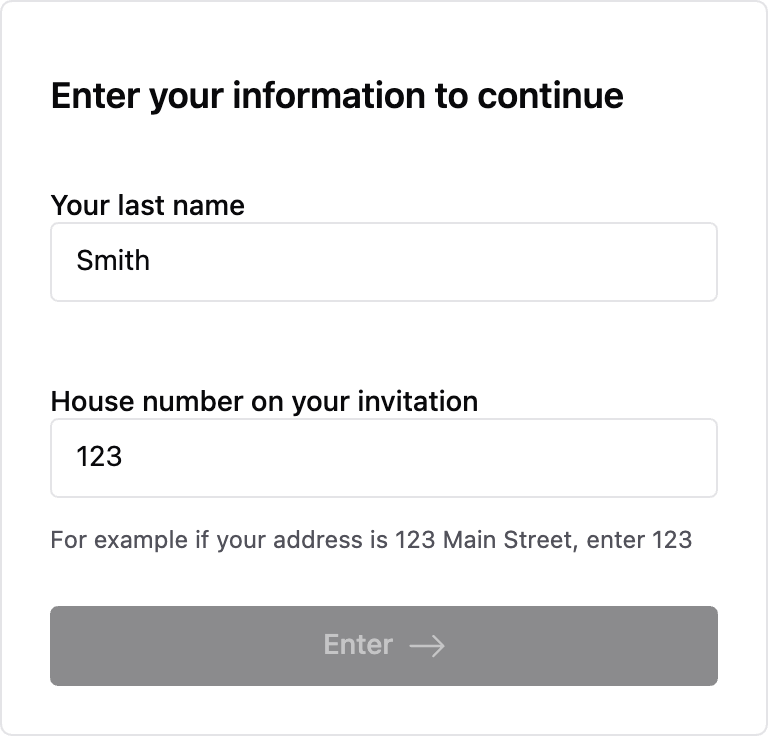
For the manual login experience without a QR code, I built a page that users who attempt to access the website without having an <code class="language-plaintext highlighter-rouge">invitationId</code> in their URL parameters are forwarded to.</p>

<p>The login page asks for the guests’ last name along with their house number on the address their invitation was sent to. This information is sent to the backend API (also just a Lambda function), and if a matching invitation is found, the user is similarly logged in and has a session cookie stored in their browser.</p>

<div class="clear" />

<p>Neither of these mechanisms are <em>extremely</em> secure and are fairly easily defeatable with a brute-force attack to try and guess the required information to log in. There’s likely exactly zero bad actors on the internet who care about accessing my wedding website, but I take putting things online very seriously, and never assume the best. Therefore, I took the additional step of implementing a throttling mechanism for the login systems that would defend against brute-force attacks. Since this was a generic tool I will definitely be re-using in future projects, I broke that library out and put it on GitHub here: <a href="https://github.com/gravitylow/ddb-token-bucket">https://github.com/gravitylow/ddb-token-bucket</a>.</p>

<p>If this throttling mechanism was ever engaged, I would be alerted and could use AWS tooling to manually block the traffic altogether. Thankfully, this never happened, but it was still good peace of mind for me having it just in case.</p>

<h3 id="the-custom-stuff">The custom stuff</h3>

<p>There are two pages on the website that made up about 90% of the complexity of this project – those are the RSVP functionality and the gift registry. These inherently require a lot more going on under the hood to make them work compared to the other relatively static pages, and, especially in the case of RSVPing, are pretty essential to get right so they work 100% of the time. They also happen to be where we had strong feelings about how they should behave, and I spent lots of time experimenting, testing, and customizing them to be what we wanted and needed.</p>

<h4 id="rsvp">RSVP</h4>

<p>From the beginning, this is what I knew I would most enjoy coding from scratch, because although it’s relatively simple functionality on its face, a number of things have to come together to make it happen well, and even more to iron out bugs and weird edge cases.</p>

<p>
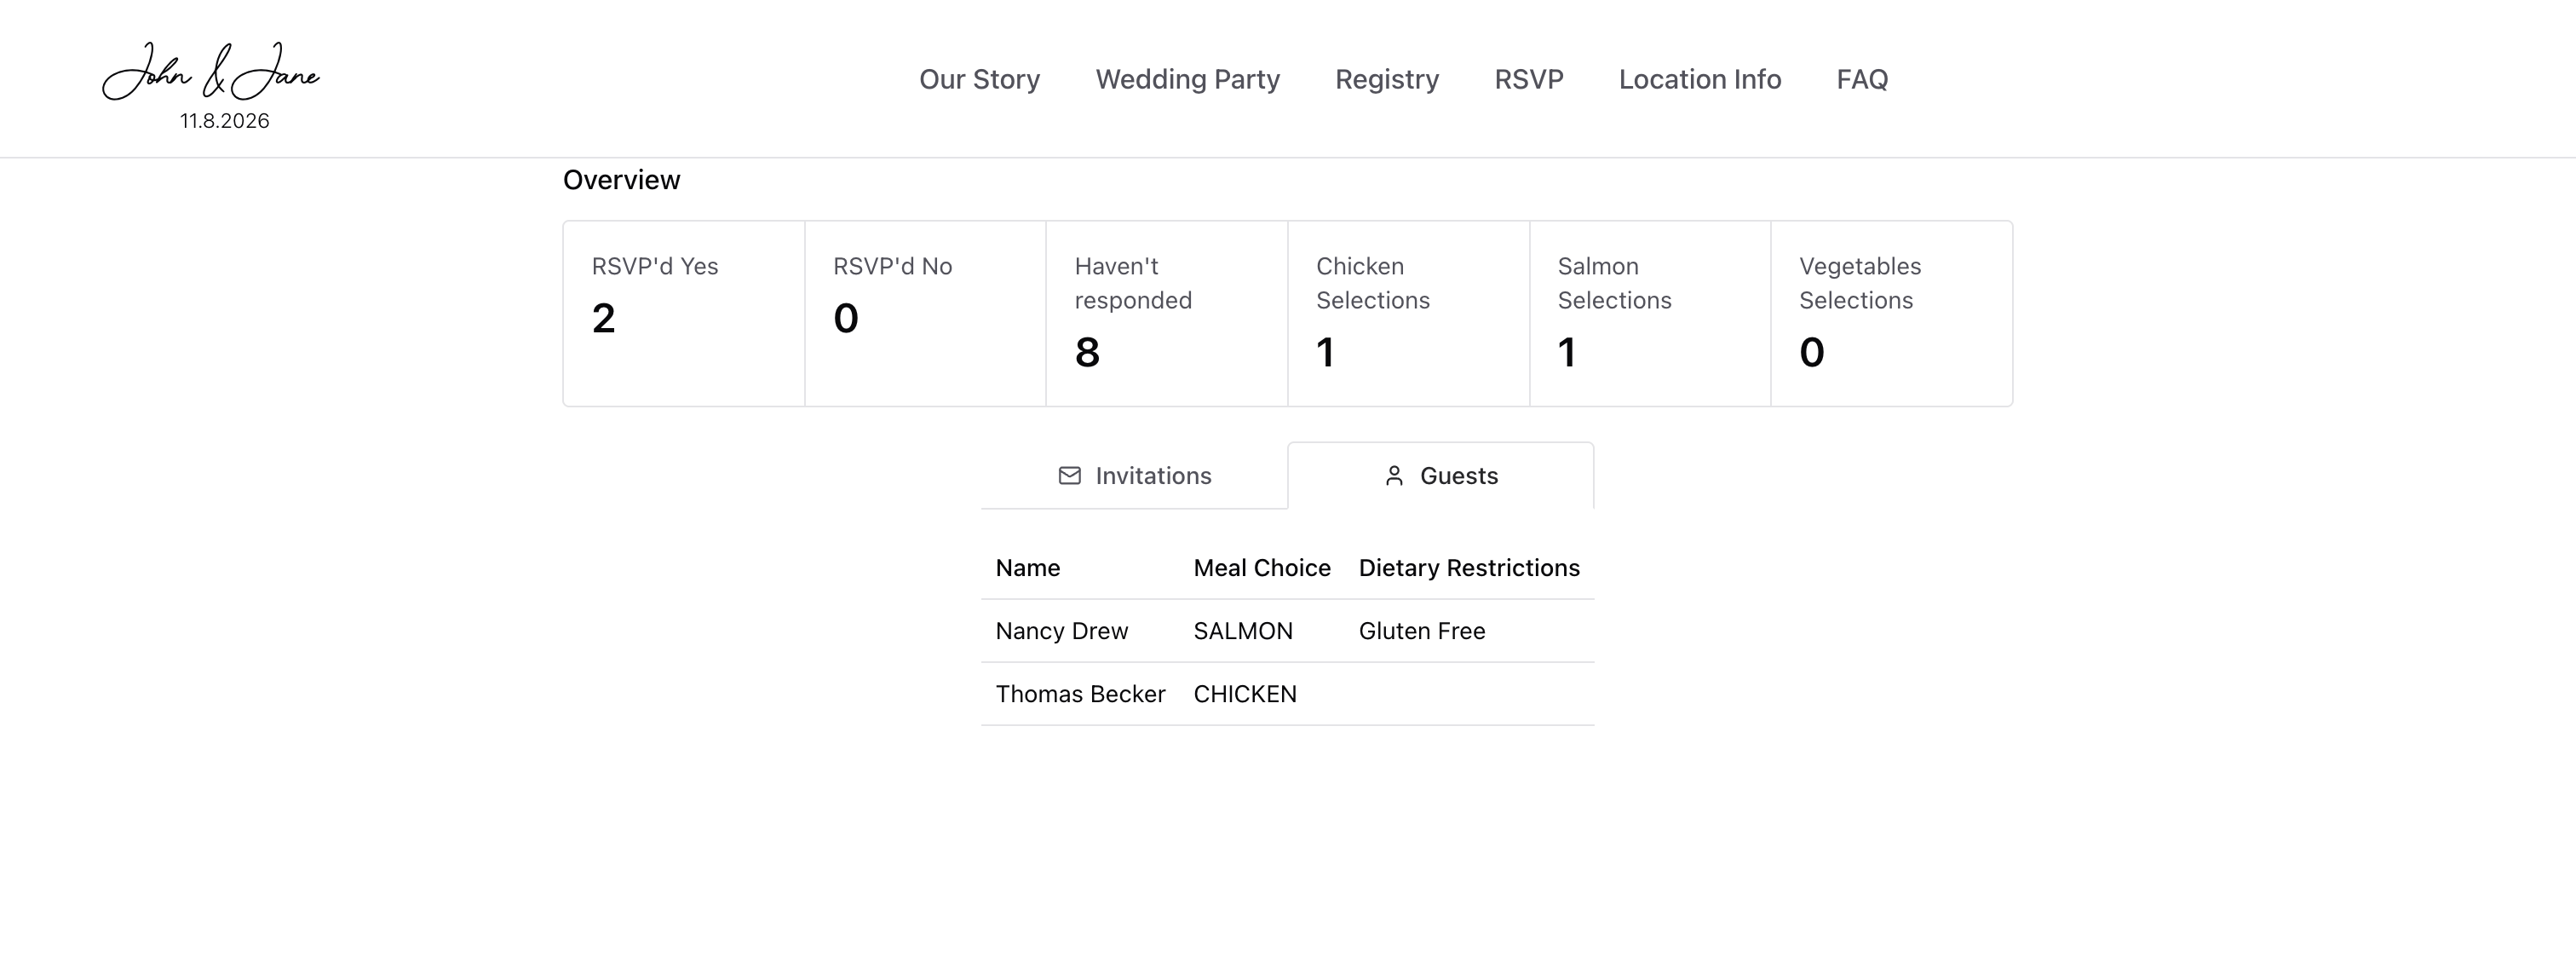
Since we opted to have a plated dinner at our reception, we needed to know more than just how many people were coming. We needed to have a list of who specifically was coming to place them on our seating chart, along with their meal choice and any dietary restrictions. This included any Plus Ones, so I’d need a way to allow guests to provide their names and meal information in the RSVP form too.</p>

<p>I also wanted to include a way for people to confirm whether or not they had already RSVP’d (I have been known to be guilty of not doing it promptly when receiving an invitation and then not remembering whether I had or had not already… I will no longer be guilty of that going forward having now gone through this experience myself) and a way for people to change their RSVP up to a certain date.</p>

<p>Here’s the representation of a Guest I ended up modeling in DynamoDB:</p>

<div class="language-json highlighter-rouge"><div class="highlight"><pre class="highlight"><code><span class="p">{</span><span class="w">
 </span><span class="nl">"GuestId"</span><span class="p">:</span><span class="w"> </span><span class="s2">"WXYZ6789"</span><span class="p">,</span><span class="w">
 </span><span class="nl">"InvitationId"</span><span class="p">:</span><span class="w"> </span><span class="s2">"ABCD1234"</span><span class="p">,</span><span class="w">
 </span><span class="nl">"GuestName"</span><span class="p">:</span><span class="w"> </span><span class="s2">"John Smith"</span><span class="p">,</span><span class="w">
 </span><span class="nl">"RequiresName"</span><span class="p">:</span><span class="w"> </span><span class="kc">false</span><span class="p">,</span><span class="w">
 </span><span class="nl">"MealChoice"</span><span class="p">:</span><span class="w"> </span><span class="s2">"CHICKEN"</span><span class="p">,</span><span class="w">
 </span><span class="nl">"RSVP"</span><span class="p">:</span><span class="w"> </span><span class="s2">"YES"</span><span class="p">,</span><span class="w">
 </span><span class="nl">"RsvpChangeCount"</span><span class="p">:</span><span class="w"> </span><span class="mi">1</span><span class="p">,</span><span class="w">
 </span><span class="nl">"Version"</span><span class="p">:</span><span class="w"> </span><span class="mi">1</span><span class="w">
</span><span class="p">}</span><span class="w">
</span></code></pre></div></div>

<p>The <code class="language-plaintext highlighter-rouge">RequiresName</code> field indicates to the frontend whether the user must provide a name for this guest when setting their RSVP to <code class="language-plaintext highlighter-rouge">YES</code>. The user can also opt not to bring a plus one and just set their RSVP to <code class="language-plaintext highlighter-rouge">NO</code> without providing a name or a meal choice.</p>

<p>Here’s how the final UI ended up looking in the RSVP interface:</p>

<p><a href="/assets/img/wedding/rsvp.png" data-lightbox="rsvp">
    <img class="faded-image" src="/assets/img/wedding/rsvp.cropped.png" alt="The RSVP page of the website, showing RSVP options for one guest and their plus-one. Under each guest name there are options for whether or not they are attending as well as a dropdown to select their meal choice. There are also text boxes to enter any dietary restrictions or accommodation requests." />
</a></p>

<p>
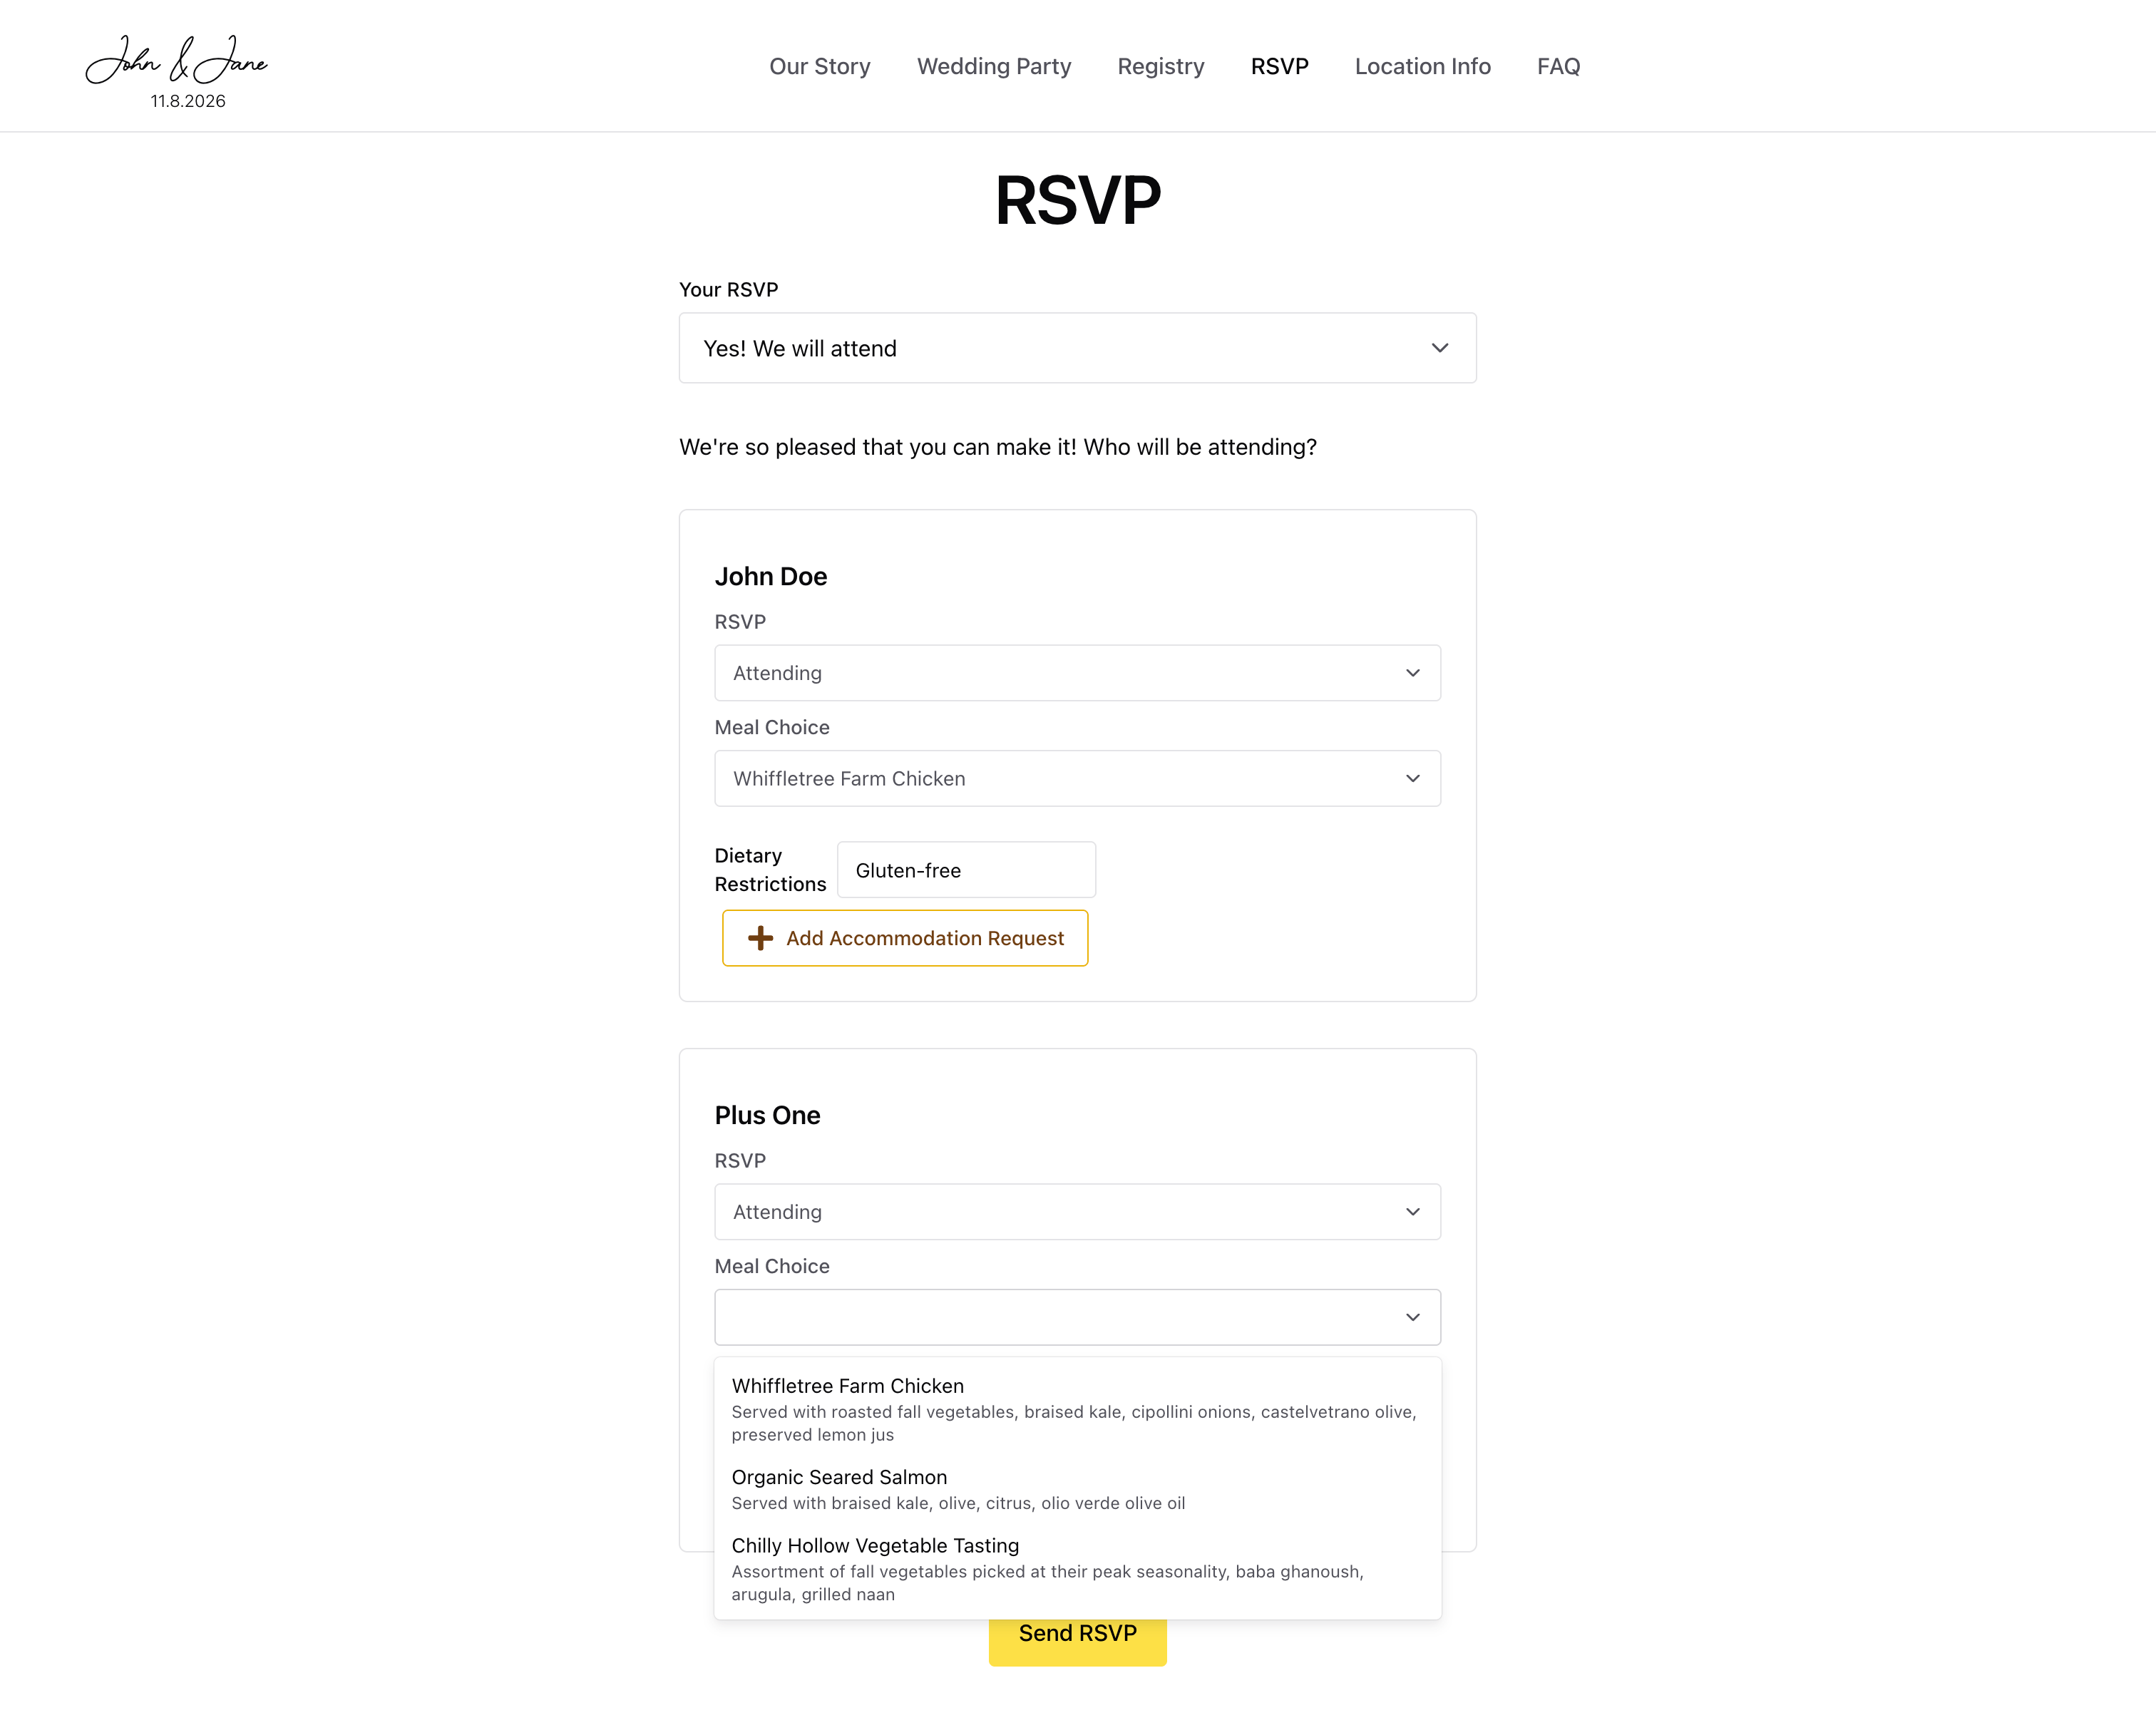
The frontend performs validation to ensure all of the input is valid, and of course this validation is duplicated on the backend before accepting the RSVP change.</p>

<p>
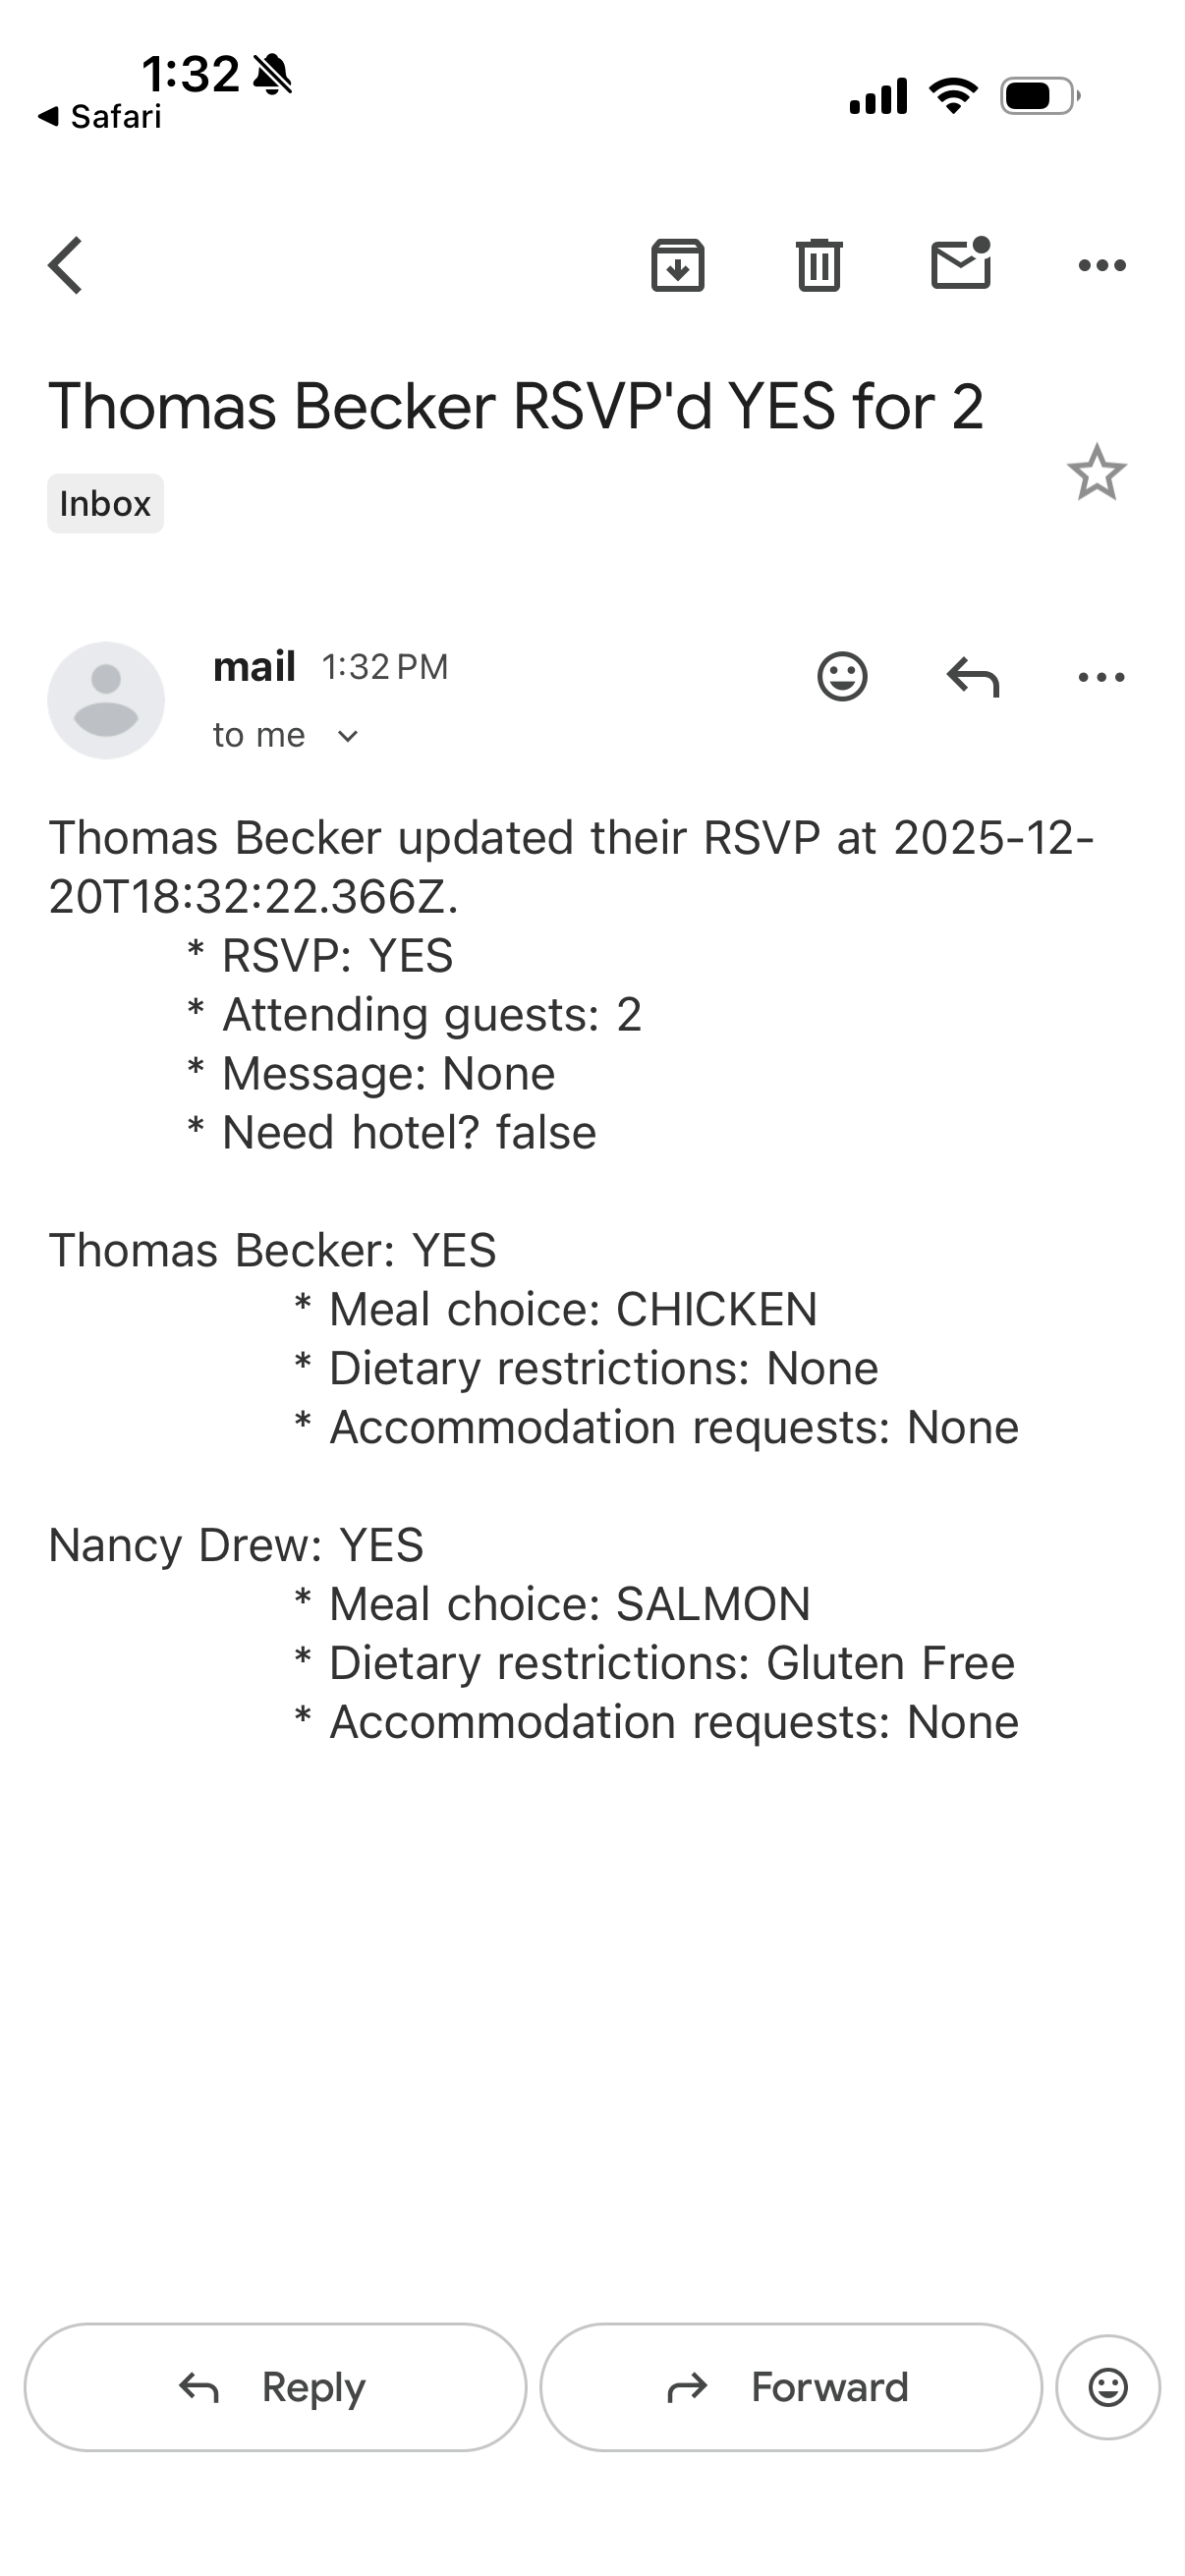
When a guest changed their RSVP, we eagerly wanted to know. So, I also integrated our backend with Simple Email Service (SES) to send my wife and I a simple email update whenever this happened:</p>

<p><a href="/assets/img/wedding/rsvp-email.png" data-lightbox="rsvp-email">
    <img class="tall-image faded-image" src="/assets/img/wedding/rsvp-email.cropped.png" alt="A screenshot of Gmail on iOS. An email is open with the subject 'Thomas Becker RSVP'd YES for 2' and the email body contains information about the guest and their plus one's RSVP details, including their meal choice and dietary restrictions." />
</a></p>

<h4 id="registry">Registry</h4>

<p>Our wedding registry was the other big task to implement from scratch, because we had a fairly unique vision for it. Rather than going a more traditional route and having our guests buy us physical items, we wanted to allow them to contribute to specific experiences on our honeymoon. As I mentioned before, we felt that having a general “cash fund” might be both disappointing to a lot of people who would want to give something specific, and also give us less of an opportunity to be grateful for the specific thing they had contributed towards.</p>

<p>Our vision for the registry was therefore to have a set list of specific additions we could allow guests to contribute towards on our honeymoon.</p>

<p><a href="/assets/img/wedding/registry.png" data-lightbox="registry">
    <img src="/assets/img/wedding/registry.png" alt="Screenshot of the wedding website's registry page, showing multiple purchasable items such as checked bags, taxi fares, dinner for two, and a night at a hotel." />
</a></p>

<p>I had never integrated with any payment processor before, so I had a lot to research and learn here. I was aware that Stripe was by far the most popular payment processing API, but at the time I started on this project, Stripe’s CEO had just posted a <a href="https://x.com/patrickc/status/1861749249043796000">tweet</a> that was at best tone-deaf and at worst in tacit support of Israel’s ongoing genocide in Palestine. I strongly believe that software engineers have a responsibility to build ethically, so given that I wasn’t already locked in to anything, I decided it would be worth some additional time to find a platform that I felt comfortable using. I landed on Square, which has great <a href="https://squareup.com/help/us/en/article/7982-manage-square-online-item-settings-from-your-item-library">product and inventory-management functionality</a> which I was excited about integrating with in order to allow my then-fiancée to easily help populate the list of honeymoon items without dealing with the code.</p>

<p>After getting all the code written for listing and displaying the inventory along with photos and descriptions, everything was working. The only thing I had to deal with myself was sending payment receipts, since I couldn’t find a way for Square to send them to the user themselves.</p>

<h2 id="rehearsal">Rehearsal</h2>

<p>With all this done, and a bunch of tweaking and bugfixing, all of the core functionality of the website was done! I throw my laptop in my backpack and hopped on the train up to New York City to see my younger brother, who also happens to be both my most trusted software engineering counterpart and Best Man in our wedding, to put it to the real test.</p>

<div class="center">
    <img class="nyc-pic" src="/assets/img/wedding/nyc-bugbash.jpg" alt="A photo of two beers on a desk with a code editor and chrome open in the background, with text that says 'It's bugbash time!'" />
    <img class="nyc-pic" src="/assets/img/wedding/nyc-carter.jpg" alt="A photo of my brother and I in Central Park" />
</div>
<div class="clear" />

<h3 id="trouble-in-squaradise">Trouble in Squaradise</h3>

<p>Sometime around 1:30am after hours of bashing website bugs, we ran into a problem we couldn’t figure out. Suddenly, the registry wasn’t working and was returning vague 403 errors in the console when we tried to complete a payment. I had been hot-fixing some bugs and deploying straight to the website so I tried to roll a few of these changes back with no success. My brother had a hunch that we had triggered some sort of fraud detection with our testing and prompted me to log in to Square, where sure enough I had a notice that my account required “additional information” in order to continue. I filled out the information they had requested from me, but in the morning I woke up to the following email:
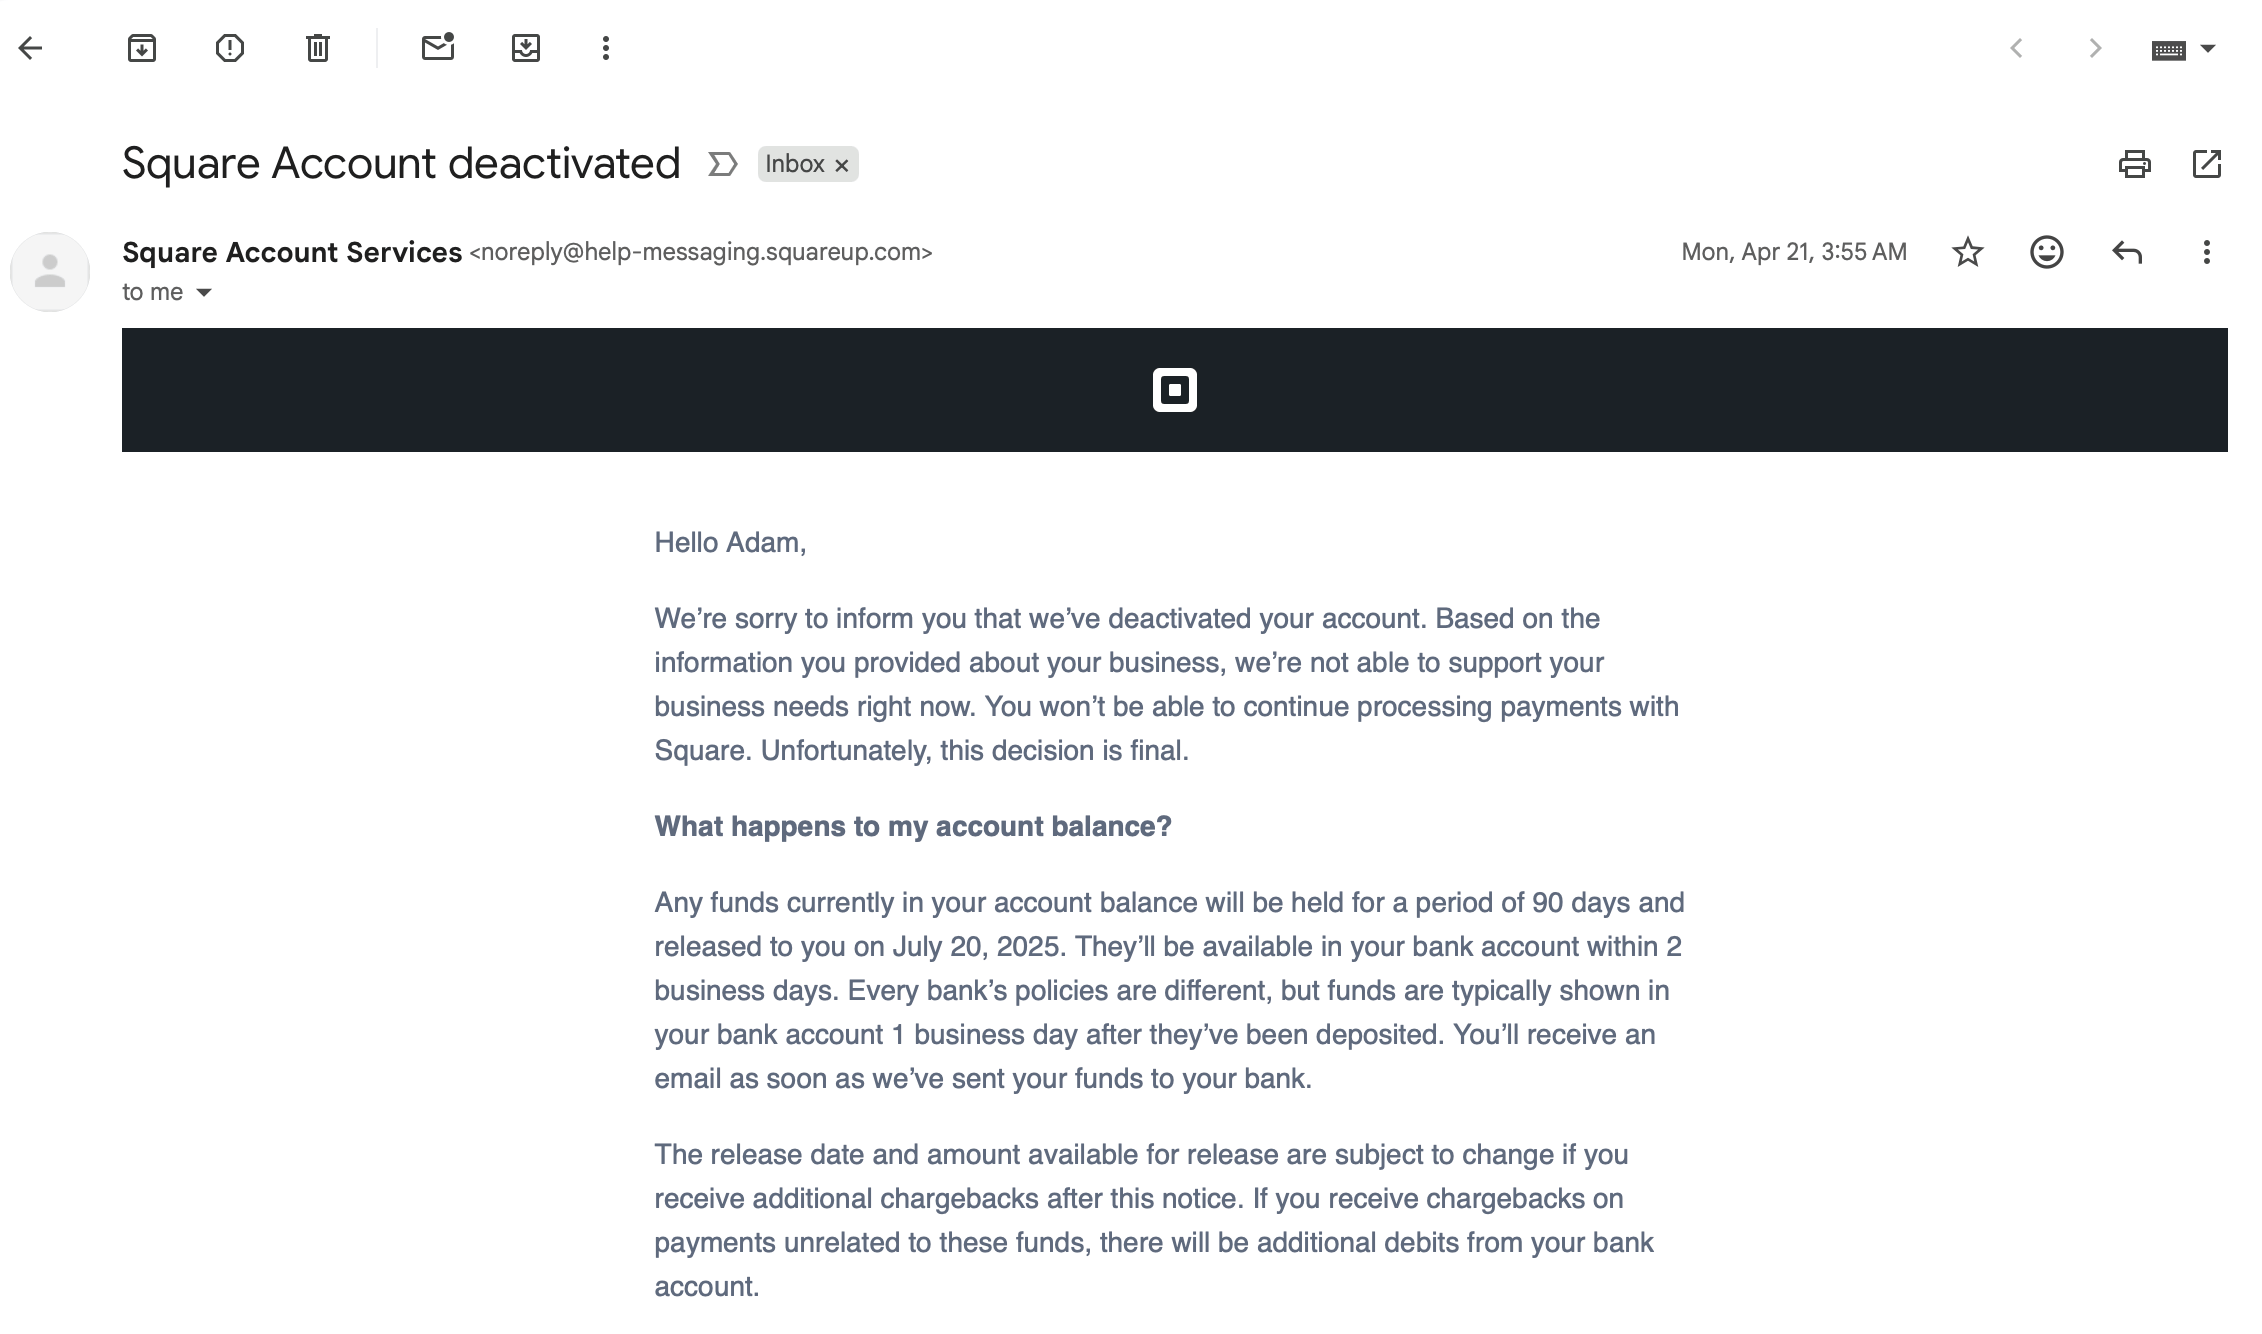
</p>

<p><a href="/assets/img/wedding/square-deactivated.png" data-lightbox="square-deactivated">
    <img src="/assets/img/wedding/square-deactivated.png" alt="A screenshot from Gmail. The email's subject is 'Square Account deactivated' and the email body states that the square account has been deactivated as square is unable to support the business needs based on the information provided. It goes on to cover details about what happens next with the account balance." />
</a></p>

<p>I feel like I <em>do</em> actually understand this response, to an extent – I wasn’t operating a business, and this use case surely didn’t fall into any normal pattern Square would care to prioritize. I was still pretty disappointed by this turn, especially considering the swiftness of the action and the amount of work I had put in to integrate with Square over another platform. Most of all, I was <strong>incredibly</strong> thankful for all the time we spent testing this integration to trigger this issue before the website went live. I had done <em>extensive</em> testing myself prior to our bug-bashing weekend and was pretty sure we were good to go. I can’t imagine how much worse this would have been if guests had started to use Square to actually buy wedding gifts before they decided on an inquisition and account closure.</p>

<p>So, I went back to Google to find another payment processor, this time making sure that they would support my weird use case.   Despite how great it was to have the full Square interface for managing inventory without changing the code, I was pretty burnt out and unwilling to rewrite all 600+ lines of code I wrote to integrate completely with the Square platform and dynamically retrieve the items and inventory from their system (I also had a policy against using AI to write any for this project – authenticity!). So, I opted for a much simpler approach where the inventory was hardcoded in the website client-side, and PayPal was used to process payments for the selected items.</p>

<div class="language-tsx highlighter-rouge"><div class="highlight"><pre class="highlight"><code><span class="k">export</span> <span class="kd">const</span> <span class="nx">REGISTRY_ITEMS</span><span class="p">:</span> <span class="nx">RegistryItem</span><span class="p">[]</span> <span class="o">=</span> <span class="p">[</span>
    <span class="p">{</span>
        <span class="na">id</span><span class="p">:</span> <span class="dl">'</span><span class="s1">checked-bags</span><span class="dl">'</span><span class="p">,</span>
        <span class="na">title</span><span class="p">:</span> <span class="dl">'</span><span class="s1">Checked Bags</span><span class="dl">'</span><span class="p">,</span>
        <span class="na">cost</span><span class="p">:</span> <span class="mi">50</span><span class="p">,</span>
        <span class="na">available</span><span class="p">:</span> <span class="mi">4</span><span class="p">,</span>
        <span class="na">image</span><span class="p">:</span> <span class="dl">'</span><span class="s1">checked-bags.jpeg</span><span class="dl">'</span><span class="p">,</span>
        <span class="na">description</span><span class="p">:</span> <span class="dl">"</span><span class="s2">...</span><span class="dl">"</span><span class="p">,</span>
    <span class="p">},</span>
    <span class="c1">// ...</span>
<span class="p">]</span>

<span class="k">return</span> <span class="p">&lt;</span><span class="nc">SimpleGrid</span><span class="p">&gt;</span>
    <span class="si">{</span> <span class="nx">REGISTRY_ITEMS</span><span class="p">.</span><span class="nx">map</span><span class="p">(</span><span class="nx">item</span> <span class="o">=&gt;</span> <span class="p">(</span>
        <span class="p">&lt;</span><span class="nc">RegistryItem</span> <span class="na">key</span><span class="p">=</span><span class="si">{</span><span class="nx">item</span><span class="p">.</span><span class="nx">id</span><span class="si">}</span> <span class="na">item</span><span class="p">=</span><span class="si">{</span><span class="nx">item</span><span class="si">}</span> <span class="p">/&gt;</span>
    <span class="p">))</span><span class="si">}</span>
<span class="p">&lt;/</span><span class="nc">SimpleGrid</span><span class="p">&gt;</span>
</code></pre></div></div>

<p>While this wouldn’t be a viable approach for purchasing real items, since it essentially would allow a technically savvy user to name their own price during check out, it was good enough for our use case where we were simply accepting gifts from website users. If anyone wanted to “cheat the system” and give a gift for less money than it “cost,” that would be fine by me.</p>

<p>So, we were back in business with PayPal and I sent the updated website off to my brother to pressure-test while I worked on an automated test suite.</p>

<h3 id="integration-testing-and-canaries">Integration Testing and Canaries</h3>

<p>As overkill as it might be to have a canary running automated tests against your wedding website, I did have a deep fear that something would go wrong and nobody would be able to RSVP to our wedding due to some bug in my code. And, I felt this from-scratch challenge wouldn’t be truly complete until I implemented everything I would actually implement for a production system I would be comfortable delivering to a client, which definitely involves testing and monitoring in production. I wanted to be the first one to know if and when I broke something with a change, or something out of my control like the Square debacle happened again.</p>

<p>I put together a Lambda that used the <a href="https://playwright.dev">Playwright</a> test framework to interact with the wedding website in production and exercise all of the functionality I cared deeply about working, especially RSVPing. Although playwright does support both UI testing as well as raw API tests, I opted to just write the UI tests since I didn’t care as much about direct usages of the API in this case. I figured that any usage that would be exercised through my testing of the website frontend would cover what users would care about.</p>

<p><a href="/assets/img/wedding/canary-metrics.png" data-lightbox="canary">
    <img class="faded-image" src="/assets/img/wedding/canary-metrics.png" alt="A snippit of a CloudWatch Dashboard showing canary lambda metrics, including TPS, errors, latency, and throttling" />
</a></p>

<p>This is the part where I could have used some lessons from my prior engineering experience a bit better. Every time I have written code that is meant to automate web browser usage running on Lambda, I feel as though I have directly accelerated the progress of my male-pattern balding. I may be naive in this area of software development, but there is absolutely <strong>no</strong> reason that this should be so difficult. Doing this months out from my wedding and pulling my hair out trying to get every one of the dependencies and Chrome command line arguments absolutely correct so that everything plays nicely together in a headless, serverless environment (where you can’t test the behavior until you deploy to that environment!!) seems like an exercise in pure insanity.</p>

<p>In order to get everything reliably working, I ended up writing a lot of boilerplate wrapper logic for the tests that would capture screenshots and logs of any of the test failures and upload them to an S3 bucket so I could understand what had occurred remotely.</p>

<p>Through an extremely long and arduous process of trial, error, and inventing new swear words, I was finally able to get the tests reliably working, and set up an EventBridge rule to run them every 10 minutes and publish metrics for their results. <a href="https://gist.github.com/gravitylow/c404d461ade92e6cb061877c8a8c45af">Here’s</a> the lambda function code I ended up with, which <em>mostly</em>, <strong>usually</strong>, works, although is not nearly as clean and locally-testable as I was envisioning when I started writing the playwright tests.</p>

<h3 id="metrics-and-logs">Metrics and logs</h3>

<p>
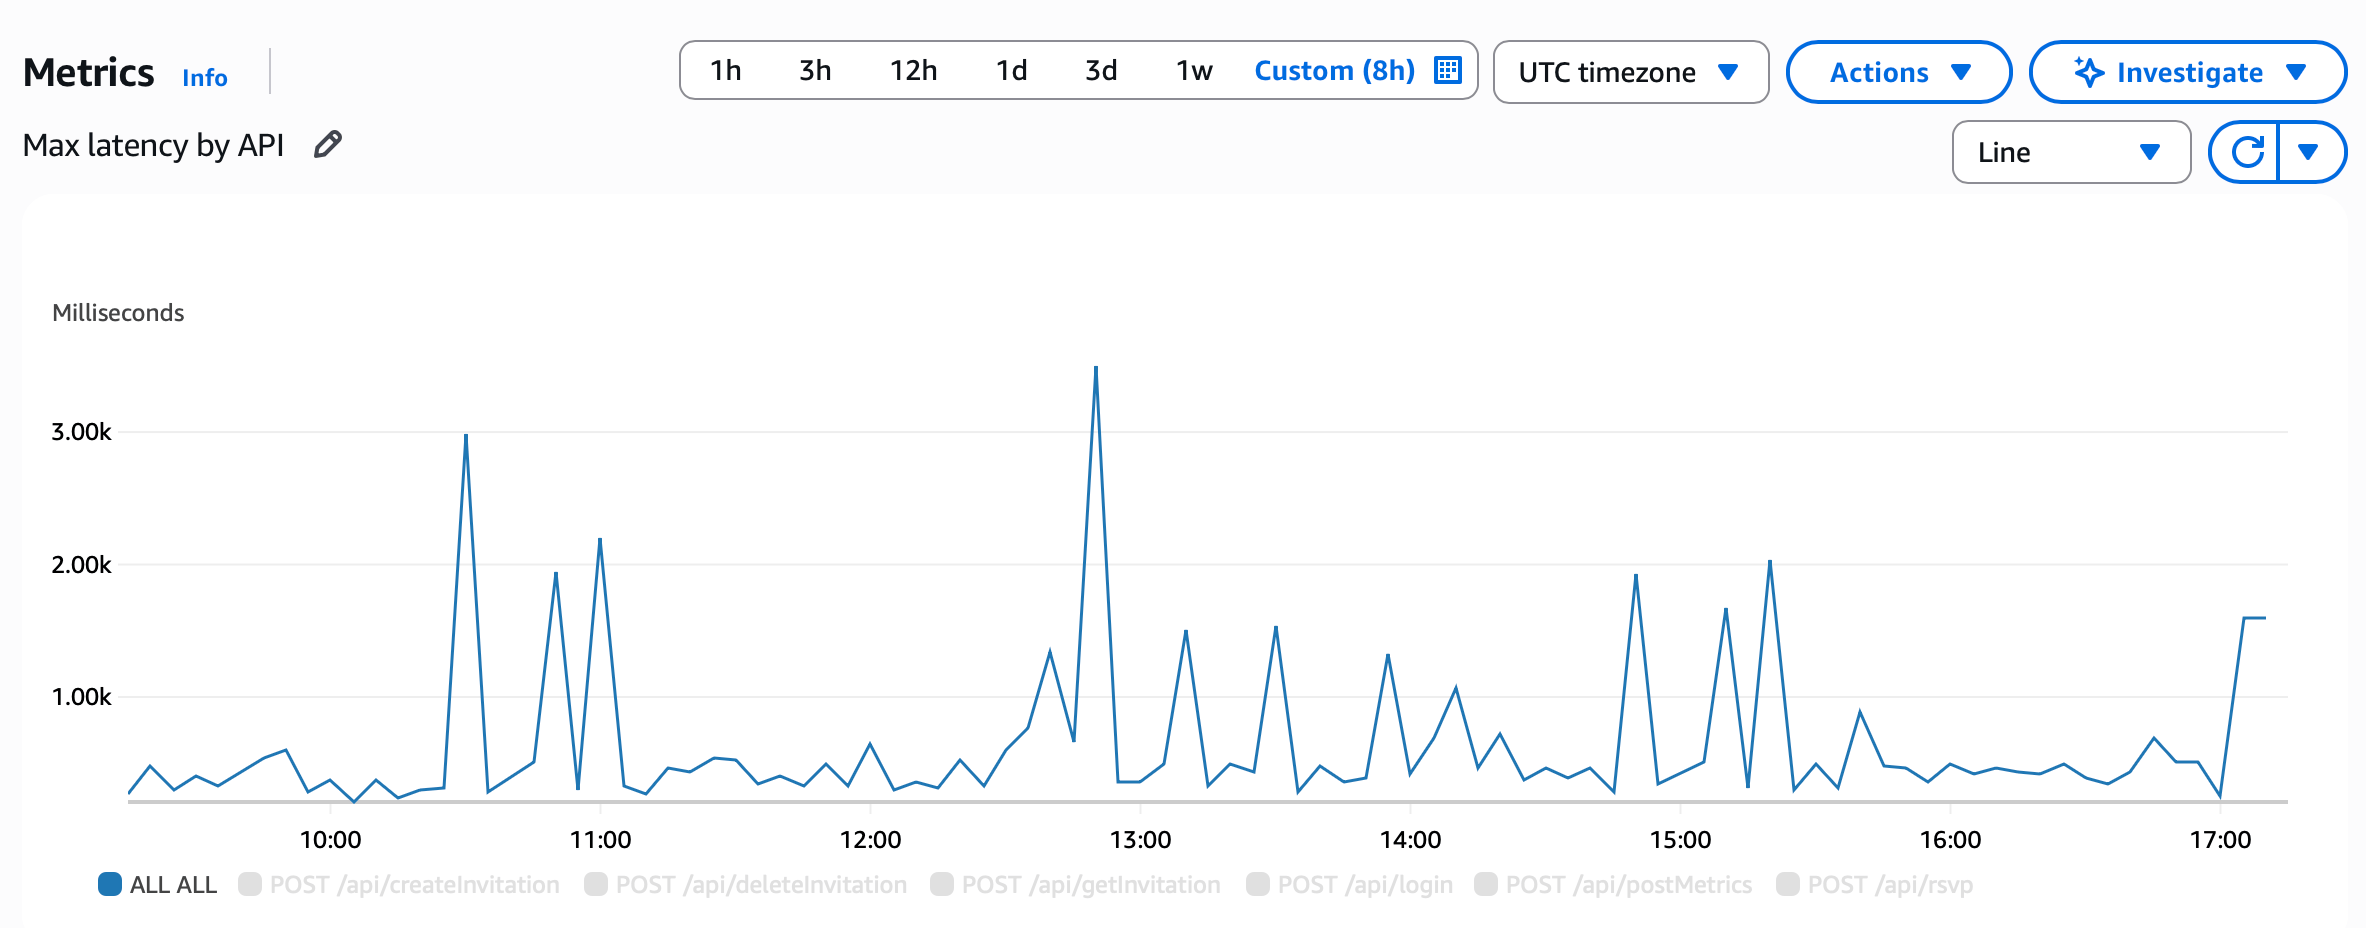
In addition to the canary metrics and metrics emitted by the server, I also created an API endpoint for the website to post metrics and logs from the client’s perspective so that I could have a full view into the performance of the website, and be alerted of any issues I needed to know about. The website creates a singleton that collects metrics and logs posted from each component, and then peridocally flushes them in the background to the server with an API call:</p>

<div class="language-ts highlighter-rouge"><div class="highlight"><pre class="highlight"><code><span class="k">import</span> <span class="p">{</span><span class="nx">Client</span><span class="p">,</span> <span class="nx">Event</span><span class="p">,</span> <span class="nx">Metric</span><span class="p">}</span> <span class="k">from</span> <span class="dl">"</span><span class="s2">wedding-client</span><span class="dl">"</span><span class="p">;</span>

<span class="k">export</span> <span class="kr">interface</span> <span class="nx">Metrics</span> <span class="p">{</span>
    <span class="nx">postEvent</span><span class="p">(</span><span class="nx">event</span><span class="p">:</span> <span class="nx">Event</span><span class="p">):</span> <span class="k">void</span><span class="p">;</span>
    <span class="nx">postMetric</span><span class="p">(</span><span class="nx">metric</span><span class="p">:</span> <span class="nx">Metric</span><span class="p">):</span> <span class="k">void</span><span class="p">;</span>
<span class="p">}</span>

<span class="k">export</span> <span class="kd">class</span> <span class="nx">MetricsPublisher</span> <span class="k">implements</span> <span class="nx">Metrics</span> <span class="p">{</span>
    <span class="k">private</span> <span class="k">readonly</span> <span class="nx">MAX_METRICS_TO_POST</span> <span class="o">=</span> <span class="mi">100</span><span class="p">;</span>
    <span class="k">private</span> <span class="k">readonly</span> <span class="nx">POST_METRICS_INTERVAL</span> <span class="o">=</span> <span class="mi">10</span> <span class="o">*</span> <span class="mi">1000</span><span class="p">;</span>

    <span class="k">private</span> <span class="k">readonly</span> <span class="nx">client</span><span class="p">:</span> <span class="nx">Client</span><span class="p">;</span>
    <span class="k">private</span> <span class="k">readonly</span> <span class="nx">invitationId</span><span class="p">:</span> <span class="kr">string</span><span class="p">;</span>
    <span class="k">private</span> <span class="nx">pendingMetrics</span><span class="p">:</span> <span class="nx">Metric</span><span class="p">[]</span> <span class="o">=</span> <span class="p">[];</span>
    <span class="k">private</span> <span class="nx">pendingEvents</span><span class="p">:</span> <span class="nx">Event</span><span class="p">[]</span> <span class="o">=</span> <span class="p">[];</span>
    <span class="k">private</span> <span class="nx">started</span><span class="p">:</span> <span class="nb">Boolean</span> <span class="o">=</span> <span class="kc">false</span><span class="p">;</span>
    <span class="k">private</span> <span class="nx">interval</span><span class="p">?:</span> <span class="kr">number</span> <span class="o">=</span> <span class="kc">undefined</span><span class="p">;</span>

    <span class="kd">constructor</span><span class="p">(</span><span class="nx">client</span><span class="p">:</span> <span class="nx">Client</span><span class="p">,</span> <span class="nx">invitationId</span><span class="p">:</span> <span class="kr">string</span><span class="p">)</span> <span class="p">{</span>
        <span class="k">this</span><span class="p">.</span><span class="nx">client</span> <span class="o">=</span> <span class="nx">client</span><span class="p">;</span>
        <span class="k">this</span><span class="p">.</span><span class="nx">invitationId</span> <span class="o">=</span> <span class="nx">invitationId</span><span class="p">;</span>
    <span class="p">}</span>

    <span class="nx">start</span><span class="p">()</span> <span class="p">{</span>
        <span class="k">if</span> <span class="p">(</span><span class="o">!</span><span class="k">this</span><span class="p">.</span><span class="nx">started</span><span class="p">)</span> <span class="p">{</span>
            <span class="k">this</span><span class="p">.</span><span class="nx">interval</span> <span class="o">=</span> <span class="nb">window</span><span class="p">.</span><span class="nx">setInterval</span><span class="p">(</span>
                <span class="p">(</span><span class="kd">function</span><span class="p">(</span><span class="nx">scope</span><span class="p">)</span> <span class="p">{</span>
                    <span class="k">return</span> <span class="kd">function</span><span class="p">(){</span>
                        <span class="nx">scope</span><span class="p">.</span><span class="nx">flushMetrics</span><span class="p">();</span>
                    <span class="p">};</span>
                <span class="p">})(</span><span class="k">this</span><span class="p">),</span>
                <span class="k">this</span><span class="p">.</span><span class="nx">POST_METRICS_INTERVAL</span>
            <span class="p">);</span>
        <span class="p">}</span>
    <span class="p">}</span>

    <span class="nx">postEvent</span><span class="p">(</span><span class="nx">event</span><span class="p">:</span> <span class="nx">Event</span><span class="p">)</span> <span class="p">{</span>
        <span class="k">this</span><span class="p">.</span><span class="nx">pendingEvents</span><span class="p">.</span><span class="nx">push</span><span class="p">(</span><span class="nx">event</span><span class="p">);</span>
    <span class="p">}</span>

    <span class="nx">postMetric</span><span class="p">(</span><span class="nx">metric</span><span class="p">:</span> <span class="nx">Metric</span><span class="p">)</span> <span class="p">{</span>
        <span class="k">this</span><span class="p">.</span><span class="nx">pendingMetrics</span><span class="p">.</span><span class="nx">push</span><span class="p">(</span><span class="nx">metric</span><span class="p">);</span>
    <span class="p">}</span>

    <span class="nx">getMetricsToPost</span> <span class="o">=</span> <span class="p">()</span> <span class="o">=&gt;</span> <span class="p">{</span>
        <span class="kd">const</span> <span class="na">metricsToPost</span><span class="p">:</span> <span class="nx">Metric</span><span class="p">[]</span> <span class="o">=</span> <span class="p">[];</span>
        <span class="kd">const</span> <span class="nx">numMetrics</span> <span class="o">=</span> <span class="nb">Math</span><span class="p">.</span><span class="nx">min</span><span class="p">(</span><span class="k">this</span><span class="p">.</span><span class="nx">pendingMetrics</span><span class="p">.</span><span class="nx">length</span><span class="p">,</span> <span class="k">this</span><span class="p">.</span><span class="nx">MAX_METRICS_TO_POST</span><span class="p">);</span>
        <span class="k">for</span> <span class="p">(</span><span class="kd">let</span> <span class="nx">i</span> <span class="o">=</span> <span class="mi">0</span><span class="p">;</span> <span class="nx">i</span> <span class="o">&lt;</span> <span class="nx">numMetrics</span><span class="p">;</span> <span class="nx">i</span><span class="o">++</span><span class="p">)</span> <span class="p">{</span>
            <span class="kd">const</span> <span class="nx">metric</span> <span class="o">=</span> <span class="k">this</span><span class="p">.</span><span class="nx">pendingMetrics</span><span class="p">.</span><span class="nx">shift</span><span class="p">();</span>
            <span class="k">if</span> <span class="p">(</span><span class="nx">metric</span><span class="p">)</span> <span class="p">{</span>
                <span class="nx">metricsToPost</span><span class="p">.</span><span class="nx">push</span><span class="p">(</span><span class="nx">metric</span><span class="p">);</span>
            <span class="p">}</span>
        <span class="p">}</span>
        <span class="k">return</span> <span class="nx">metricsToPost</span><span class="p">;</span>
    <span class="p">}</span>

    <span class="nx">getEventsToPost</span> <span class="o">=</span> <span class="p">()</span> <span class="o">=&gt;</span> <span class="p">{</span>
        <span class="kd">const</span> <span class="na">eventsToPost</span><span class="p">:</span> <span class="nx">Event</span><span class="p">[]</span> <span class="o">=</span> <span class="p">[];</span>
        <span class="kd">const</span> <span class="nx">numEvents</span> <span class="o">=</span> <span class="nb">Math</span><span class="p">.</span><span class="nx">min</span><span class="p">(</span><span class="k">this</span><span class="p">.</span><span class="nx">pendingEvents</span><span class="p">.</span><span class="nx">length</span><span class="p">,</span> <span class="k">this</span><span class="p">.</span><span class="nx">MAX_METRICS_TO_POST</span><span class="p">);</span>
        <span class="k">for</span> <span class="p">(</span><span class="kd">let</span> <span class="nx">i</span> <span class="o">=</span> <span class="mi">0</span><span class="p">;</span> <span class="nx">i</span> <span class="o">&lt;</span> <span class="nx">numEvents</span><span class="p">;</span> <span class="nx">i</span><span class="o">++</span><span class="p">)</span> <span class="p">{</span>
            <span class="kd">const</span> <span class="nx">event</span> <span class="o">=</span> <span class="k">this</span><span class="p">.</span><span class="nx">pendingEvents</span><span class="p">.</span><span class="nx">shift</span><span class="p">();</span>
            <span class="k">if</span> <span class="p">(</span><span class="nx">event</span><span class="p">)</span> <span class="p">{</span>
                <span class="nx">eventsToPost</span><span class="p">.</span><span class="nx">push</span><span class="p">(</span><span class="nx">event</span><span class="p">);</span>
            <span class="p">}</span>
        <span class="p">}</span>
        <span class="k">return</span> <span class="nx">eventsToPost</span><span class="p">;</span>
    <span class="p">}</span>

    <span class="nx">flushMetrics</span><span class="p">()</span> <span class="p">{</span>
        <span class="kd">const</span> <span class="nx">metricsToPost</span> <span class="o">=</span> <span class="k">this</span><span class="p">.</span><span class="nx">getMetricsToPost</span><span class="p">();</span>
        <span class="kd">const</span> <span class="nx">eventsToPost</span> <span class="o">=</span> <span class="k">this</span><span class="p">.</span><span class="nx">getEventsToPost</span><span class="p">();</span>
        <span class="k">if</span> <span class="p">(</span><span class="nx">metricsToPost</span><span class="p">.</span><span class="nx">length</span> <span class="o">&gt;</span> <span class="mi">0</span> <span class="o">||</span> <span class="nx">eventsToPost</span><span class="p">.</span><span class="nx">length</span> <span class="o">&gt;</span> <span class="mi">0</span><span class="p">)</span> <span class="p">{</span>
            <span class="k">if</span> <span class="p">(</span><span class="nb">window</span><span class="p">.</span><span class="nx">location</span><span class="p">.</span><span class="nx">host</span><span class="p">.</span><span class="nx">startsWith</span><span class="p">(</span><span class="dl">'</span><span class="s1">localhost</span><span class="dl">'</span><span class="p">))</span> <span class="p">{</span>
                <span class="c1">// Don't post metrics when running locally</span>
                <span class="nx">console</span><span class="p">.</span><span class="nx">log</span><span class="p">(</span><span class="dl">'</span><span class="s1">would have posted metrics </span><span class="dl">'</span><span class="p">,</span> <span class="nx">metricsToPost</span><span class="p">);</span>
                <span class="nx">console</span><span class="p">.</span><span class="nx">log</span><span class="p">(</span><span class="dl">'</span><span class="s1">would have posted events </span><span class="dl">'</span><span class="p">,</span> <span class="nx">eventsToPost</span><span class="p">);</span>
            <span class="p">}</span> <span class="k">else</span> <span class="p">{</span>
                <span class="k">this</span><span class="p">.</span><span class="nx">client</span><span class="p">.</span><span class="nx">postMetrics</span><span class="p">({</span>
                    <span class="na">invitationId</span><span class="p">:</span> <span class="k">this</span><span class="p">.</span><span class="nx">invitationId</span><span class="p">,</span>
                    <span class="na">metrics</span><span class="p">:</span> <span class="nx">metricsToPost</span><span class="p">,</span>
                    <span class="na">events</span><span class="p">:</span> <span class="nx">eventsToPost</span><span class="p">,</span>
                <span class="p">}).</span><span class="k">catch</span><span class="p">(</span><span class="nx">error</span> <span class="o">=&gt;</span> <span class="p">{</span>
                    <span class="nx">console</span><span class="p">.</span><span class="nx">error</span><span class="p">(</span><span class="dl">'</span><span class="s1">error posting metrics</span><span class="dl">'</span><span class="p">,</span> <span class="nx">error</span><span class="p">);</span>
                <span class="p">});</span>
            <span class="p">}</span>
        <span class="p">}</span>
    <span class="p">};</span>
<span class="p">}</span>
</code></pre></div></div>

<p>On the server side, I used the <a href="https://docs.aws.amazon.com/powertools/typescript/latest/features/metrics/"><code class="language-plaintext highlighter-rouge">@aws-lambda-powertools/metrics</code></a> library to post metrics emitted by the server or from the client to CloudWatch using the embedded CloudWatch Logs format, to avoid synchronous latency added by calling CloudWatch APIs as part of the request. As part of this process, I discovered that the CloudWatch metrics aggregations worked a bit differently than the model I had in my head – what I really wanted was the ability to alarm on a top-level aggregate metric, such as unhandled errors on any page on the website. If alerted, I wanted the ability to break that metric down to a list of unhandled error metrics for each page, to quickly determine what page was at issue before turning to the logs.</p>

<p><a href="/assets/img/wedding/metrics-all.png" data-lightbox="metrics">
    <img src="/assets/img/wedding/metrics-all.png" alt="A screenshot of a CloudWatch metric from the AWS Console. The metric title is 'Max latency by API' and shows the 'ALL' metric selected, with individual APIs such as 'createInvitation' and 'rsvp' unselected and greyed out." />
</a></p>

<p><a href="/assets/img/wedding/metrics-by-api.png" data-lightbox="metrics">
    <img src="/assets/img/wedding/metrics-by-api.png" alt="Another screenshot of the same metric, with the previously unselected per-API metrics now visible. The ALL aggregation shows the maximum of all of these individual API latencies." />
</a></p>

<p>I had actually thought that CloudWatch would do this sort of dimension aggregation automatically, but that turned out not to be true, so to achieve this I wrote a wrapper around the metrics that would automatically aggregate any metric into an <code class="language-plaintext highlighter-rouge">ALL</code> dimension, to achieve a top-level view:</p>

<div class="language-ts highlighter-rouge"><div class="highlight"><pre class="highlight"><code><span class="k">public</span> <span class="k">static</span> <span class="nx">closeMetrics</span><span class="p">(</span><span class="nx">requestId</span><span class="p">:</span> <span class="kr">string</span><span class="p">)</span> <span class="p">{</span>
    <span class="c1">// Create the shared metrics instance for originals + aggregates</span>
    <span class="kd">const</span> <span class="nx">metrics</span> <span class="o">=</span> <span class="k">new</span> <span class="nx">Metrics</span><span class="p">({</span>
        <span class="na">namespace</span><span class="p">:</span> <span class="dl">'</span><span class="s1">wedding_website</span><span class="dl">'</span><span class="p">,</span>
        <span class="na">serviceName</span><span class="p">:</span> <span class="dl">'</span><span class="s1">server</span><span class="dl">'</span><span class="p">,</span>
    <span class="p">});</span>
    <span class="c1">// Add the original dimensions for the metric</span>
    <span class="nx">metrics</span><span class="p">.</span><span class="nx">addDimensions</span><span class="p">(</span><span class="k">this</span><span class="p">.</span><span class="nx">metricDimensions</span><span class="p">[</span><span class="nx">requestId</span><span class="p">]);</span>
    <span class="c1">// Add the original metric values</span>
    <span class="nx">MetricsProvider</span><span class="p">.</span><span class="nx">metricsToPublish</span><span class="p">[</span><span class="nx">requestId</span><span class="p">].</span><span class="nx">forEach</span><span class="p">(</span><span class="nx">metric</span> <span class="o">=&gt;</span> <span class="p">{</span>
        <span class="nx">metrics</span><span class="p">.</span><span class="nx">addMetric</span><span class="p">(</span><span class="nx">metric</span><span class="p">.</span><span class="nx">name</span><span class="p">,</span> <span class="nx">metric</span><span class="p">.</span><span class="nx">unit</span><span class="p">,</span> <span class="nx">metric</span><span class="p">.</span><span class="nx">value</span><span class="p">,</span> <span class="nx">metric</span><span class="p">.</span><span class="nx">resolution</span><span class="p">);</span>
    <span class="p">})</span>
    <span class="c1">// Publish the original metrics with their dimensions</span>
    <span class="nx">metrics</span><span class="p">.</span><span class="nx">publishStoredMetrics</span><span class="p">();</span>
    <span class="nx">metrics</span><span class="p">.</span><span class="nx">clearDimensions</span><span class="p">();</span>

    <span class="c1">// Publish aggregates by setting every key of the original dimension to a value of ALL</span>
    <span class="nb">Object</span><span class="p">.</span><span class="nx">keys</span><span class="p">(</span><span class="k">this</span><span class="p">.</span><span class="nx">metricDimensions</span><span class="p">[</span><span class="nx">requestId</span><span class="p">]).</span><span class="nx">forEach</span><span class="p">(</span><span class="nx">dimension</span> <span class="o">=&gt;</span> <span class="p">{</span>
        <span class="nx">metrics</span><span class="p">.</span><span class="nx">addDimension</span><span class="p">(</span><span class="nx">dimension</span><span class="p">,</span> <span class="dl">'</span><span class="s1">ALL</span><span class="dl">'</span><span class="p">);</span>
    <span class="p">});</span>
    <span class="c1">// Add the original metric values</span>
    <span class="nx">MetricsProvider</span><span class="p">.</span><span class="nx">metricsToPublish</span><span class="p">[</span><span class="nx">requestId</span><span class="p">].</span><span class="nx">forEach</span><span class="p">(</span><span class="nx">metric</span> <span class="o">=&gt;</span> <span class="p">{</span>
        <span class="nx">metrics</span><span class="p">.</span><span class="nx">addMetric</span><span class="p">(</span><span class="nx">metric</span><span class="p">.</span><span class="nx">name</span><span class="p">,</span> <span class="nx">metric</span><span class="p">.</span><span class="nx">unit</span><span class="p">,</span> <span class="nx">metric</span><span class="p">.</span><span class="nx">value</span><span class="p">,</span> <span class="nx">metric</span><span class="p">.</span><span class="nx">resolution</span><span class="p">);</span>
    <span class="p">})</span>
    <span class="c1">// Publish the aggregated metrics with ALL dimensions</span>
    <span class="nx">metrics</span><span class="p">.</span><span class="nx">publishStoredMetrics</span><span class="p">();</span>
    <span class="nx">metrics</span><span class="p">.</span><span class="nx">clearDimensions</span><span class="p">();</span>
<span class="p">}</span>
</code></pre></div></div>

<p>This aggregation was expensive, but I felt it was worth it. I ended up with about 104 unique metrics across the server, website, and canary which, as I mentioned earlier, contributed to about 90% of the cost of this project.</p>

<p>In addition to the metrics, I wanted a way to easily see what was happening across my website that didn’t involve diving into the lambda log streams, such as the distinct Events emitted by the frontend client. I created another DynamoDB facet called an <code class="language-plaintext highlighter-rouge">AuditLog</code> which I wrote to with a record of each mutating API call, and with events submitted from the clients:</p>

<div class="language-json highlighter-rouge"><div class="highlight"><pre class="highlight"><code><span class="p">{</span><span class="w">
 </span><span class="nl">"LogId"</span><span class="p">:</span><span class="w"> </span><span class="s2">"MIJMNB7LU0OOAL"</span><span class="p">,</span><span class="w">
 </span><span class="nl">"LogType"</span><span class="p">:</span><span class="w"> </span><span class="s2">"RSVP_VALIDATION_ERROR"</span><span class="p">,</span><span class="w">
 </span><span class="nl">"Message"</span><span class="p">:</span><span class="w"> </span><span class="s2">"Website displayed a validation error"</span><span class="p">,</span><span class="w">
 </span><span class="nl">"ResourceId"</span><span class="p">:</span><span class="w"> </span><span class="s2">"MIJMMG5ACYH5U9"</span><span class="p">,</span><span class="w">
 </span><span class="nl">"ResourceType"</span><span class="p">:</span><span class="w"> </span><span class="s2">"INVITATION"</span><span class="p">,</span><span class="w">
 </span><span class="nl">"EventData"</span><span class="p">:</span><span class="w"> </span><span class="p">{</span><span class="w">
  </span><span class="nl">"errors"</span><span class="p">:</span><span class="w"> </span><span class="s2">"At least one guest must be attending, otherwise please RSVP no."</span><span class="w">
 </span><span class="p">},</span><span class="w">
 </span><span class="nl">"LogDay"</span><span class="p">:</span><span class="w"> </span><span class="s2">"2025-11-29"</span><span class="p">,</span><span class="w">
 </span><span class="nl">"Timestamp"</span><span class="p">:</span><span class="w"> </span><span class="mi">1764380580207</span><span class="p">,</span><span class="w">
</span><span class="p">}</span><span class="w">
</span></code></pre></div></div>

<p>This would help me quickly notice any common issues that my guests were encountering and fix them proactively. As one example of where this came in useful, I noticed that there were a number of errors guests were encountering when manually logging in, and from the logs it was clear the reason why was that they were using their full house address instead of just the number (for example entering <code class="language-plaintext highlighter-rouge">123 Main St.</code> instead of just <code class="language-plaintext highlighter-rouge">123</code>), which would cause the guest lookup to fail. I was able to fix this common issue by just adding a fallback to check the first “word” in an input containing strings against the house number I had in my database:</p>

<div class="language-diff highlighter-rouge"><div class="highlight"><pre class="highlight"><code> for (const invitation of invitationsMatchingLastName) {
     const houseNumberMatches = invitation.houseNumber.trim().toLowerCase() === input.houseNumber.trim().toLowerCase();
<span class="gd">-    if (houseNumberMatches) {
</span><span class="gi">+    const firstWordMatches = input.houseNumber.trim().includes(" ") &amp;&amp; input.houseNumber.trim().toUpperCase().split(" ")[0] == invitation.houseNumber.trim().toLowerCase();
+    if (houseNumberMatches || firstWordMatches) {
</span>         await UpdateInvitation.recordLogin(ClientProvider.ddb, invitation, invitation.version, Date.now());
         await CreateAuditLog.createLog(ClientProvider.ddb, {
             logId: generateId(),
</code></pre></div></div>

<p>This dropped the number of failed login events to almost zero, and would not have been as easy to discover and proactively fix without these logs showing up on my dashboard.</p>

<p>In addition to the ability to retrieve logs by particular resource ID (i.e. logs for a particular invitation), I wanted to be able to query Dynamo for all logs in a particular timeframe (e.g. the last 48 hours). Creating a GSI using the <code class="language-plaintext highlighter-rouge">LogDay</code> attribute allowed doing this (without creating a hot key issue) by issuing multiple Query requests for the days included in the requested timeframe, and then filtering down further in memory:</p>

<div class="language-ts highlighter-rouge"><div class="highlight"><pre class="highlight"><code><span class="c1">// Get all days involved in the provided range</span>
<span class="kd">const</span> <span class="nx">daysArray</span><span class="p">:</span> <span class="kr">string</span><span class="p">[]</span> <span class="o">=</span> <span class="p">[];</span>
<span class="k">for</span> <span class="p">(</span><span class="kd">const</span> <span class="nx">dt</span> <span class="o">=</span> <span class="k">new</span> <span class="nb">Date</span><span class="p">(</span><span class="nx">startTimestamp</span><span class="p">);</span> <span class="nx">dt</span> <span class="o">&lt;=</span> <span class="k">new</span> <span class="nb">Date</span><span class="p">(</span><span class="nx">endTimestamp</span><span class="p">);</span> <span class="nx">dt</span><span class="p">.</span><span class="nx">setDate</span><span class="p">(</span><span class="nx">dt</span><span class="p">.</span><span class="nx">getDate</span><span class="p">()</span> <span class="o">+</span> <span class="mi">1</span><span class="p">))</span> <span class="p">{</span>
    <span class="nx">days</span><span class="p">.</span><span class="nx">push</span><span class="p">(</span><span class="k">new</span> <span class="nb">Date</span><span class="p">(</span><span class="nx">dt</span><span class="p">).</span><span class="nx">toISOString</span><span class="p">().</span><span class="nx">slice</span><span class="p">(</span><span class="mi">0</span><span class="p">,</span> <span class="mi">10</span><span class="p">));</span> <span class="c1">// Add the ISO date string up to the day</span>
<span class="p">}</span>
<span class="kd">const</span> <span class="nx">logs</span><span class="p">:</span> <span class="nx">AuditLog</span><span class="p">[]</span> <span class="o">=</span> <span class="p">[];</span>
<span class="c1">// Iterate over all days we need to retrieve from Dynamo</span>
<span class="k">for</span> <span class="p">(</span><span class="kd">const</span> <span class="nx">day</span> <span class="k">of</span> <span class="nx">daysArray</span><span class="p">)</span> <span class="p">{</span>
    <span class="c1">// Paginate over all logs in the day's index</span>
    <span class="kd">let</span> <span class="nx">nextToken</span><span class="p">:</span> <span class="nb">Record</span><span class="o">&lt;</span><span class="kr">string</span><span class="p">,</span> <span class="kr">string</span><span class="o">&gt;</span> <span class="o">|</span> <span class="kc">undefined</span> <span class="o">=</span> <span class="kc">undefined</span><span class="p">;</span>
        <span class="k">do</span> <span class="p">{</span>
            <span class="kd">const</span> <span class="na">dayLogsPage</span><span class="p">:</span> <span class="nx">Page</span><span class="o">&lt;</span><span class="nx">AuditLog</span><span class="p">[]</span><span class="o">&gt;</span> <span class="o">=</span> <span class="k">await</span> <span class="nx">ReadAuditLog</span><span class="p">.</span><span class="nx">readLogs</span><span class="p">(</span><span class="nx">ClientProvider</span><span class="p">.</span><span class="nx">ddb</span><span class="p">,</span> <span class="nx">day</span><span class="p">,</span> <span class="nx">input</span><span class="p">.</span><span class="nx">resourceType</span><span class="p">,</span> <span class="nx">input</span><span class="p">.</span><span class="nx">resourceId</span><span class="p">,</span> <span class="nx">nextToken</span><span class="p">);</span>
            <span class="k">for</span> <span class="p">(</span><span class="kd">const</span> <span class="nx">log</span> <span class="k">of</span> <span class="nx">dayLogsPage</span><span class="p">.</span><span class="nx">items</span><span class="p">)</span> <span class="p">{</span>
                <span class="k">if</span> <span class="p">(</span><span class="nx">log</span><span class="p">.</span><span class="nx">timestamp</span> <span class="o">&gt;=</span> <span class="nx">startTimestamp</span><span class="p">.</span><span class="nx">getTime</span><span class="p">()</span> <span class="o">&amp;&amp;</span> <span class="nx">log</span><span class="p">.</span><span class="nx">timestamp</span> <span class="o">&lt;=</span> <span class="nx">endTimestamp</span><span class="p">.</span><span class="nx">getTime</span><span class="p">())</span> <span class="p">{</span>
                    <span class="nx">logs</span><span class="p">.</span><span class="nx">push</span><span class="p">(</span><span class="nx">log</span><span class="p">);</span>
                <span class="p">}</span>
            <span class="p">}</span>
            <span class="nx">nextToken</span> <span class="o">=</span> <span class="nx">dayLogsPage</span><span class="p">.</span><span class="nx">nextStartKey</span><span class="p">;</span>
        <span class="p">}</span> <span class="k">while</span> <span class="p">(</span><span class="nx">nextToken</span> <span class="o">!==</span> <span class="kc">undefined</span><span class="p">)</span>
    <span class="p">}</span>
</code></pre></div></div>

<p>This allowed me to build an API to efficiently retrieve logs for any arbitrary timeframe, and optionally for a specific resource:</p>

<div class="language-bash highlighter-rouge"><div class="highlight"><pre class="highlight"><code>% curl <span class="nt">-s</span> <span class="nt">-X</span> POST <span class="s2">"https://demo.wedding/api/getAuditLogs"</span> <span class="se">\</span>
  <span class="nt">-H</span> ... <span class="se">\</span>
  <span class="nt">-d</span> <span class="s1">'{"notBeforeTimestamp": "2025-12-15T00:00:00Z", "notAfterTimestamp": "2025-12-21T18:00:00Z"}'</span> | <span class="se">\</span>
  jq <span class="nt">-r</span> <span class="s1">'.results[] | [.timestamp, .logType, .resourceId, .message] | @tsv'</span>
1766255542283	UPDATE_RSVP	MJ187UHU24NP22	RSVPs were updated <span class="k">for </span>2 guests: Thomas Becker <span class="o">=&gt;</span> YES, Nancy Drew <span class="o">=&gt;</span> YES
1766254347071	CLIENT_ERROR	MJ187UHU24NP22	Website client encountered an error
1766254275184	LOGIN_SUCCESS	MJ187UHU24NP22	User successfully authenticated as Thomas Becker <span class="o">(</span>MJ187UHU24NP22<span class="o">)</span> using lastName <span class="o">=</span> Becker, houseNumber <span class="o">=</span> 123
</code></pre></div></div>

<h3 id="alerting">Alerting</h3>

<p>After setting up metrics, audit logs, and a canary, I needed a way to alert myself when something unexpected was happening. I signed up for PagerDuty and used its integration with CloudWatch to page me if any alarming thresholds were breached. I was really happy with PagerDuty, especially the ability to configure the paging policy to only alert me during the day and never page me overnight, and once I got all the alarm thresholds tweaked correctly, I was surprised that things were completely quiet… I should have been a bit more skeptical.</p>

<p><a class="float-left" href="/assets/img/wedding/pagerduty-unauthenticated.jpg" data-lightbox="pagerduty-unauthenticated">
    <img src="/assets/img/wedding/pagerduty-unauthenticated.jpg" alt="A screenshot of the PagerDuty on iOS. The application is greyed out and a dialog box says 'Your credentials have expired or your access to the application has been revoked. Please try signing in again.'" />
</a></p>

<p>After a few weeks of letting the website run in production, I opened the PagerDuty app on my phone only to find that I had been logged out of my account. I initially assumed there was some sort of expiry on the login session, which would have been annoying, however I still would have been alerted through my backup methods (email and SMS). Instead, I tried to log back in to my account and just kept getting the same message about invalid credentials.</p>

<p>Having flashbacks to Square disabling my account with no warning, I went to the PagerDuty website and logged in there to finally discover the issue: my “trial” had expired.</p>

<p><a href="/assets/img/wedding/pagerduty-trial.png" data-lightbox="pagerduty-trial">
    <img src="/assets/img/wedding/pagerduty-trial.png" alt="A screenshot of the top of the PagerDuty dashboard. There is a banner at the top which says 'Oh no! Your trial has expired. Check out our plans to keep using PagerDuty.'" />
</a></p>

<p>When you sign up for a new PagerDuty account, you are offered multiple plan options ranging from free to paid. I only needed the free functionality for my use case and never used the paid plan, but despite this, it seems that <em>any</em> new PagerDuty account is automatically enrolled in a free trial of the paid platform. When this trial expires, not only are your logged-in applications’ credentials invalidated, but your account also stops accepting any alerts from integrations until you choose not to continue with the paid features. Assuming I must have clicked something wrong when signing up for PagerDuty originally, I restarted this process with a new account and ran into the same issue, without ever utilizing any non-free features. I tried but couldn’t even pre-empt this lockout by opting out of the paid platform early in favor of the free product.</p>

<p>To me, this silent lockout behavior was shocking coming from an availability platform whose sole role is alerting you when something went wrong – I would much rather just be paged to tell me that my trial had ended, and that action was required to continue coverage, than silently stop receiving alerts for an application I had already put into production. I reported this sharp edge to PagerDuty via their feedback page in September of 2025, and as of posting this it doesn’t seem to have been addressed. Although I would recommend PagerDuty once you’re fully onboarded, this is an extremely dangerous sharp edge which urgently needs fixing in my opinion.</p>

<p>A funny thing that happened to me as a result of having this paging setup which monitored my service running on AWS, while also working at AWS, was that I happened to be on-call for our team in EC2 during the recent <a href="https://aws.amazon.com/message/101925/">DynamoDB event in us-east-1</a>, and started receiving pages from both our internal monitoring systems and my wedding website:</p>

<p><a href="/assets/img/wedding/wedding-page.png" data-lightbox="wedding-page">
    <img class="tall-image" src="/assets/img/wedding/wedding-page.png" alt="A screenshot of two critical notifications on the iOS lockscreen, one is from the Amazon paging app and the notification text is redacted, while the other is from PagerDuty and states that the 5xx error rate for the wedding website has breached the threshold." />
</a></p>

<p>
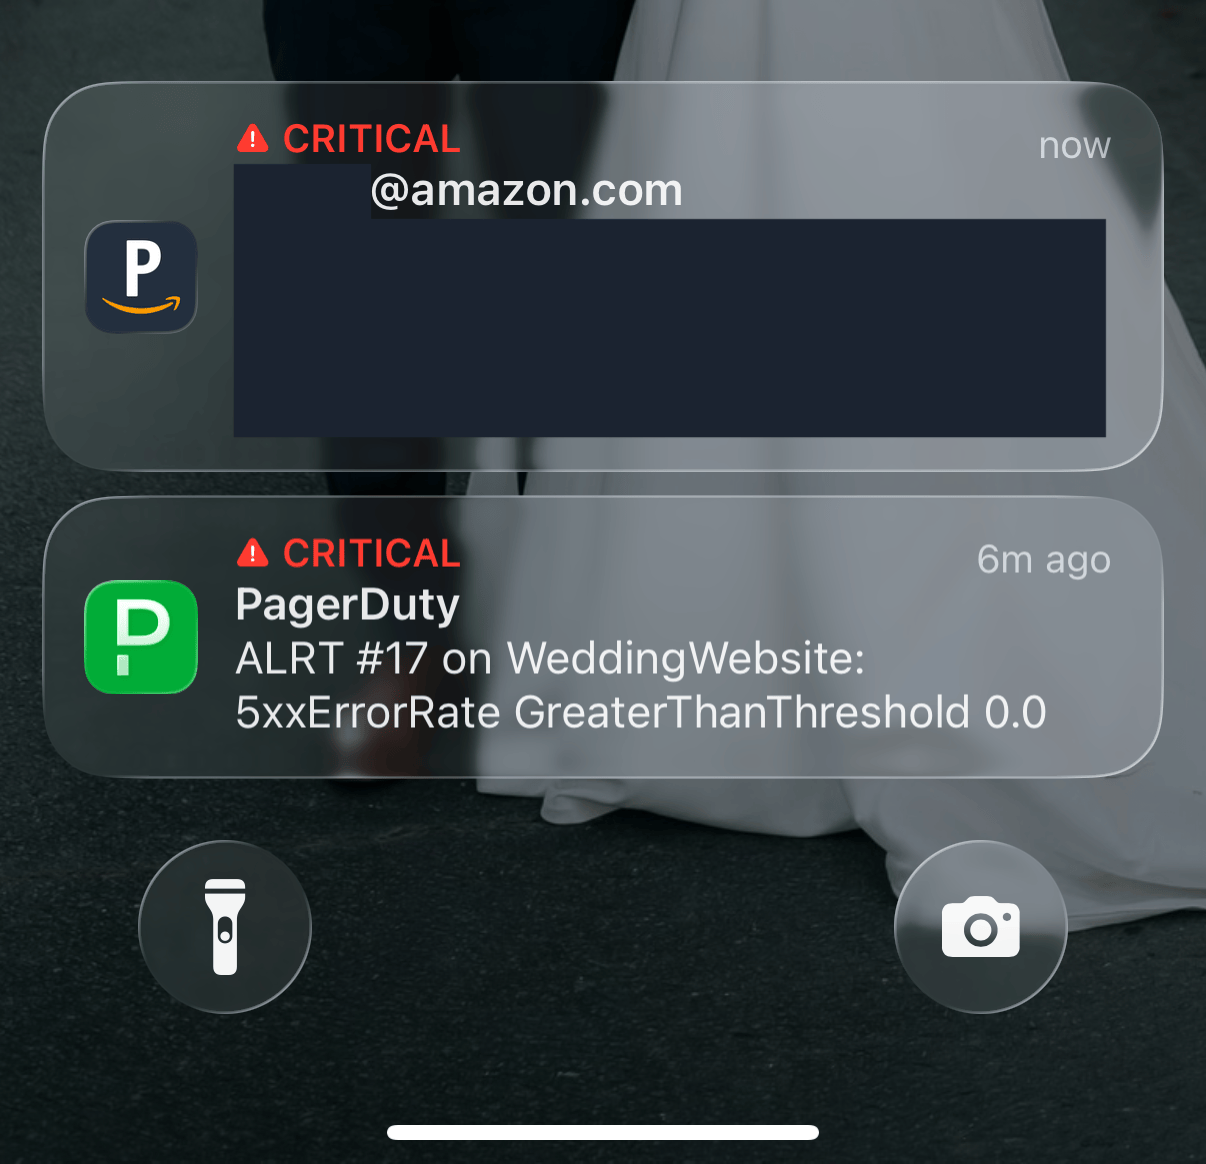
Needless to say, I knew which of those alerts took priority, but I was happy at least to see that my monitoring was working correctly!!</p>

<h2 id="going-live">Going Live</h2>

<p>After working through all these details and getting the website finished, tested, and properly monitored, I was more than ready for some work on the human side of this project! Putting our RSVP vision into action was enabled using the <a href="https://www.npmjs.com/package/@react-pdf/renderer"><code class="language-plaintext highlighter-rouge">@react-pdf/renderer</code></a> library, which allowed me to generate a printable file with the individualized QR codes for each recipient. I color and font-matched these with the invitations themselves, which we designed and ordered on <a href="https://www.minted.com">Minted</a> (which we LOVED and cannot say enough good things about). I included some tiny text at the top of each RSVP card so that we could match the recipient with their envelope. The end result was a sleek experience both visually and technically.
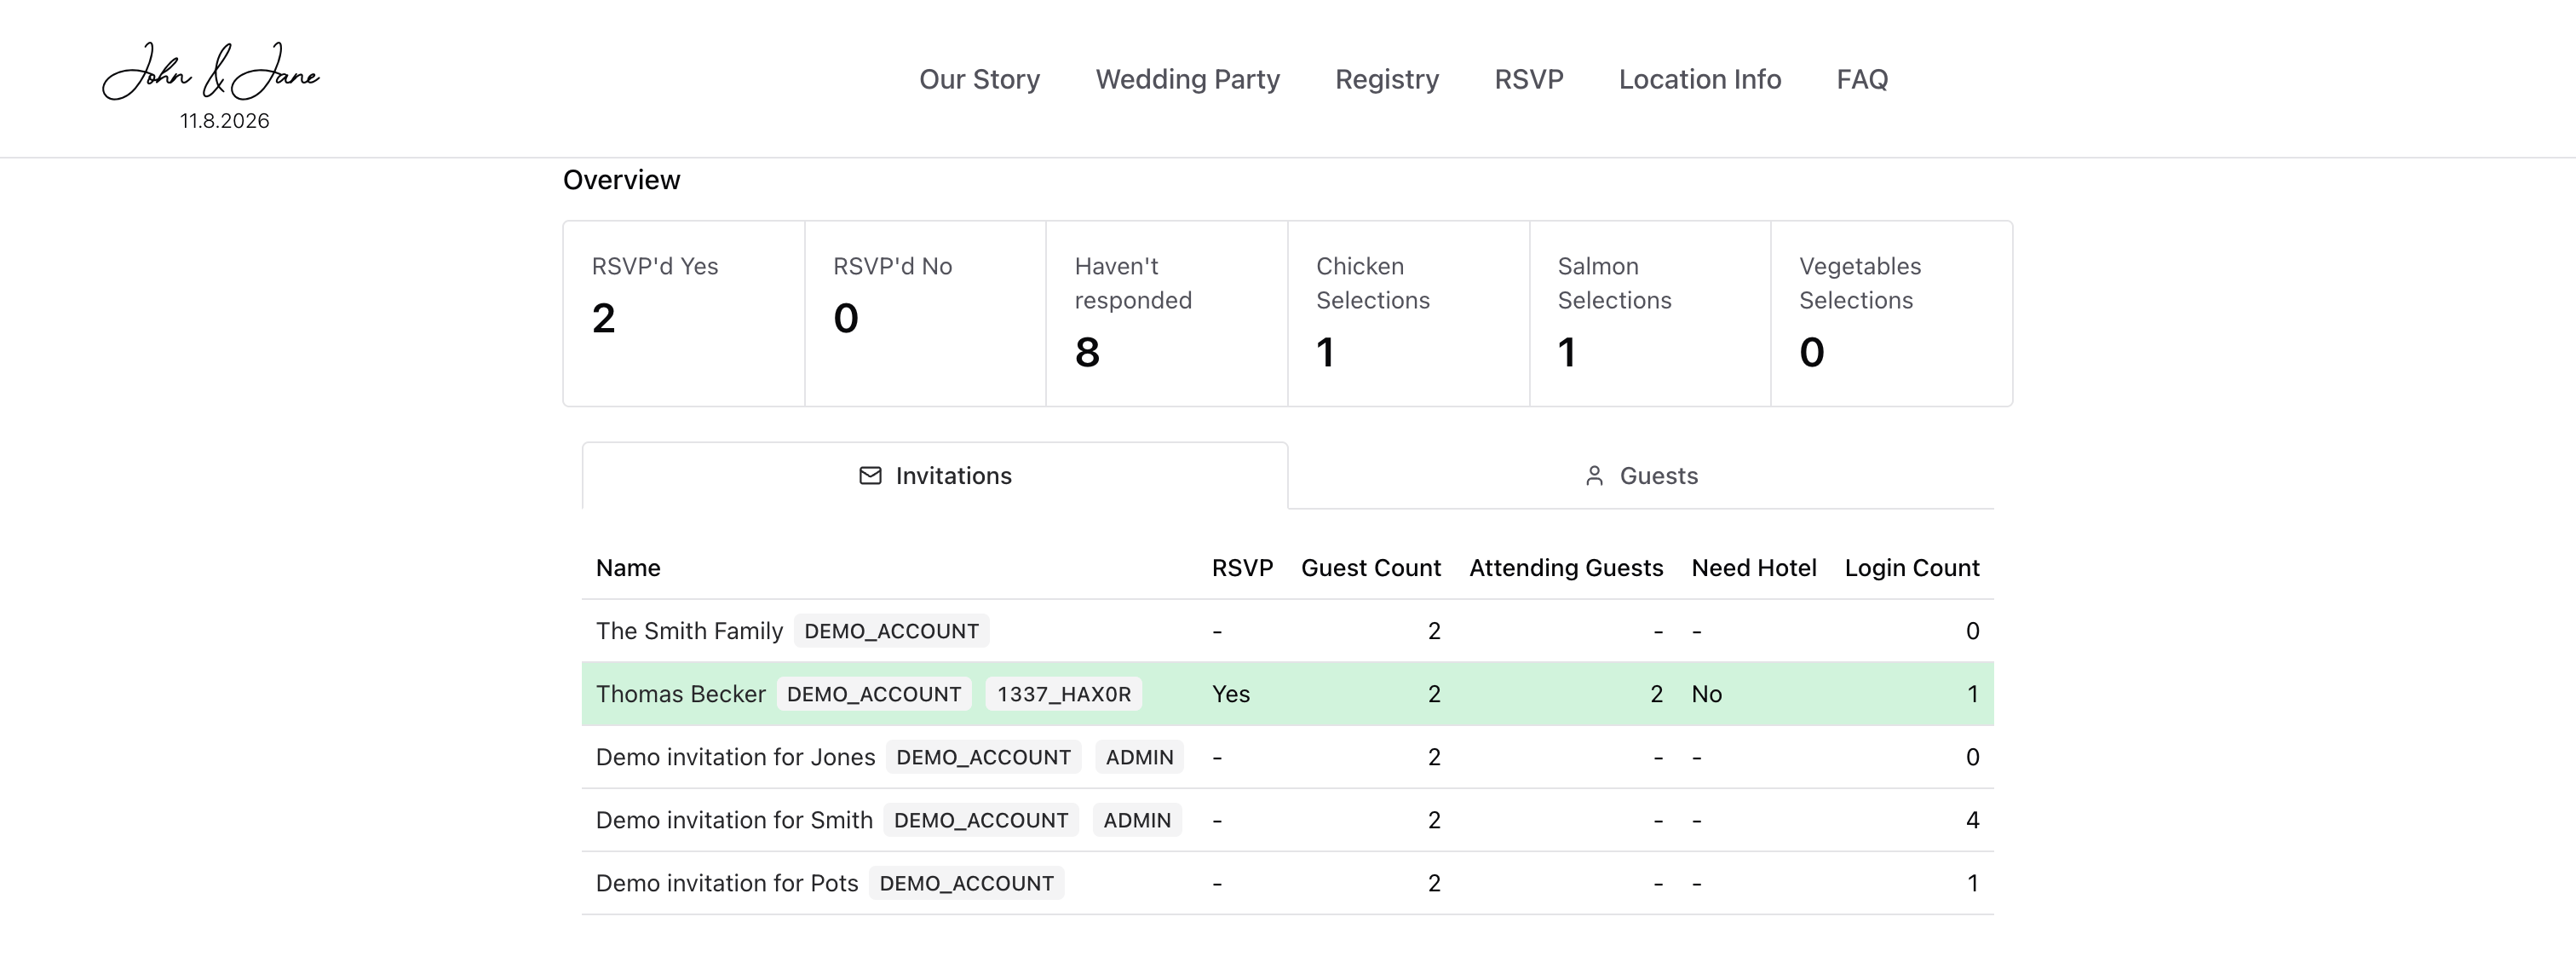
</p>

<p><a href="/assets/img/wedding/rsvp-sheets.png" data-lightbox="rsvp-sheets">
    <img src="/assets/img/wedding/rsvp-sheets.png" alt="A screenshot of the Preview app on MacOS, showing a PDF open. The PDF contains multiple of the previously seen QR code inserts for the invitations, with small names of the invitees at the top and dotted lines for cutting." />
</a></p>

<h3 id="admin-console">Admin console</h3>

<p>While eagerly awaiting the responses from our guests, I built us some protected admin pages into the website to track the progress of our responses, and to be able to export the data we and our vendors needed, such as meal choices and wedding gift details.</p>

<div class="gallery">
  <div class="gallery-item">
    <a href="/assets/img/wedding/admin-invitations.png" data-lightbox="admin-gallery">
      <img src="/assets/img/wedding/admin-invitations.png" alt="A screenshot of the admin page on the wedding website, showing all of the invitations to the wedding. People who have RSVP'd yes are highlighted in green, and there are counters on the top to show how many responses are outstanding." />
    </a>
    <div class="desc">A view of all the invitations and who has responded</div>
  </div>
  <div class="gallery-item">
    <a href="/assets/img/wedding/admin-guests.png" data-lightbox="admin-gallery">
      <img src="/assets/img/wedding/admin-guests.png" alt="Another screenshot of the admin page, this time showing each guest's RSVP, their meal choice, and any dietary restrictions" />
    </a>
    <div class="desc">A view of each guest, their RSVP, and meal preferences</div>
  </div>
</div>

<h2 id="one-last-hurrah">One Last Hurrah</h2>

<p>
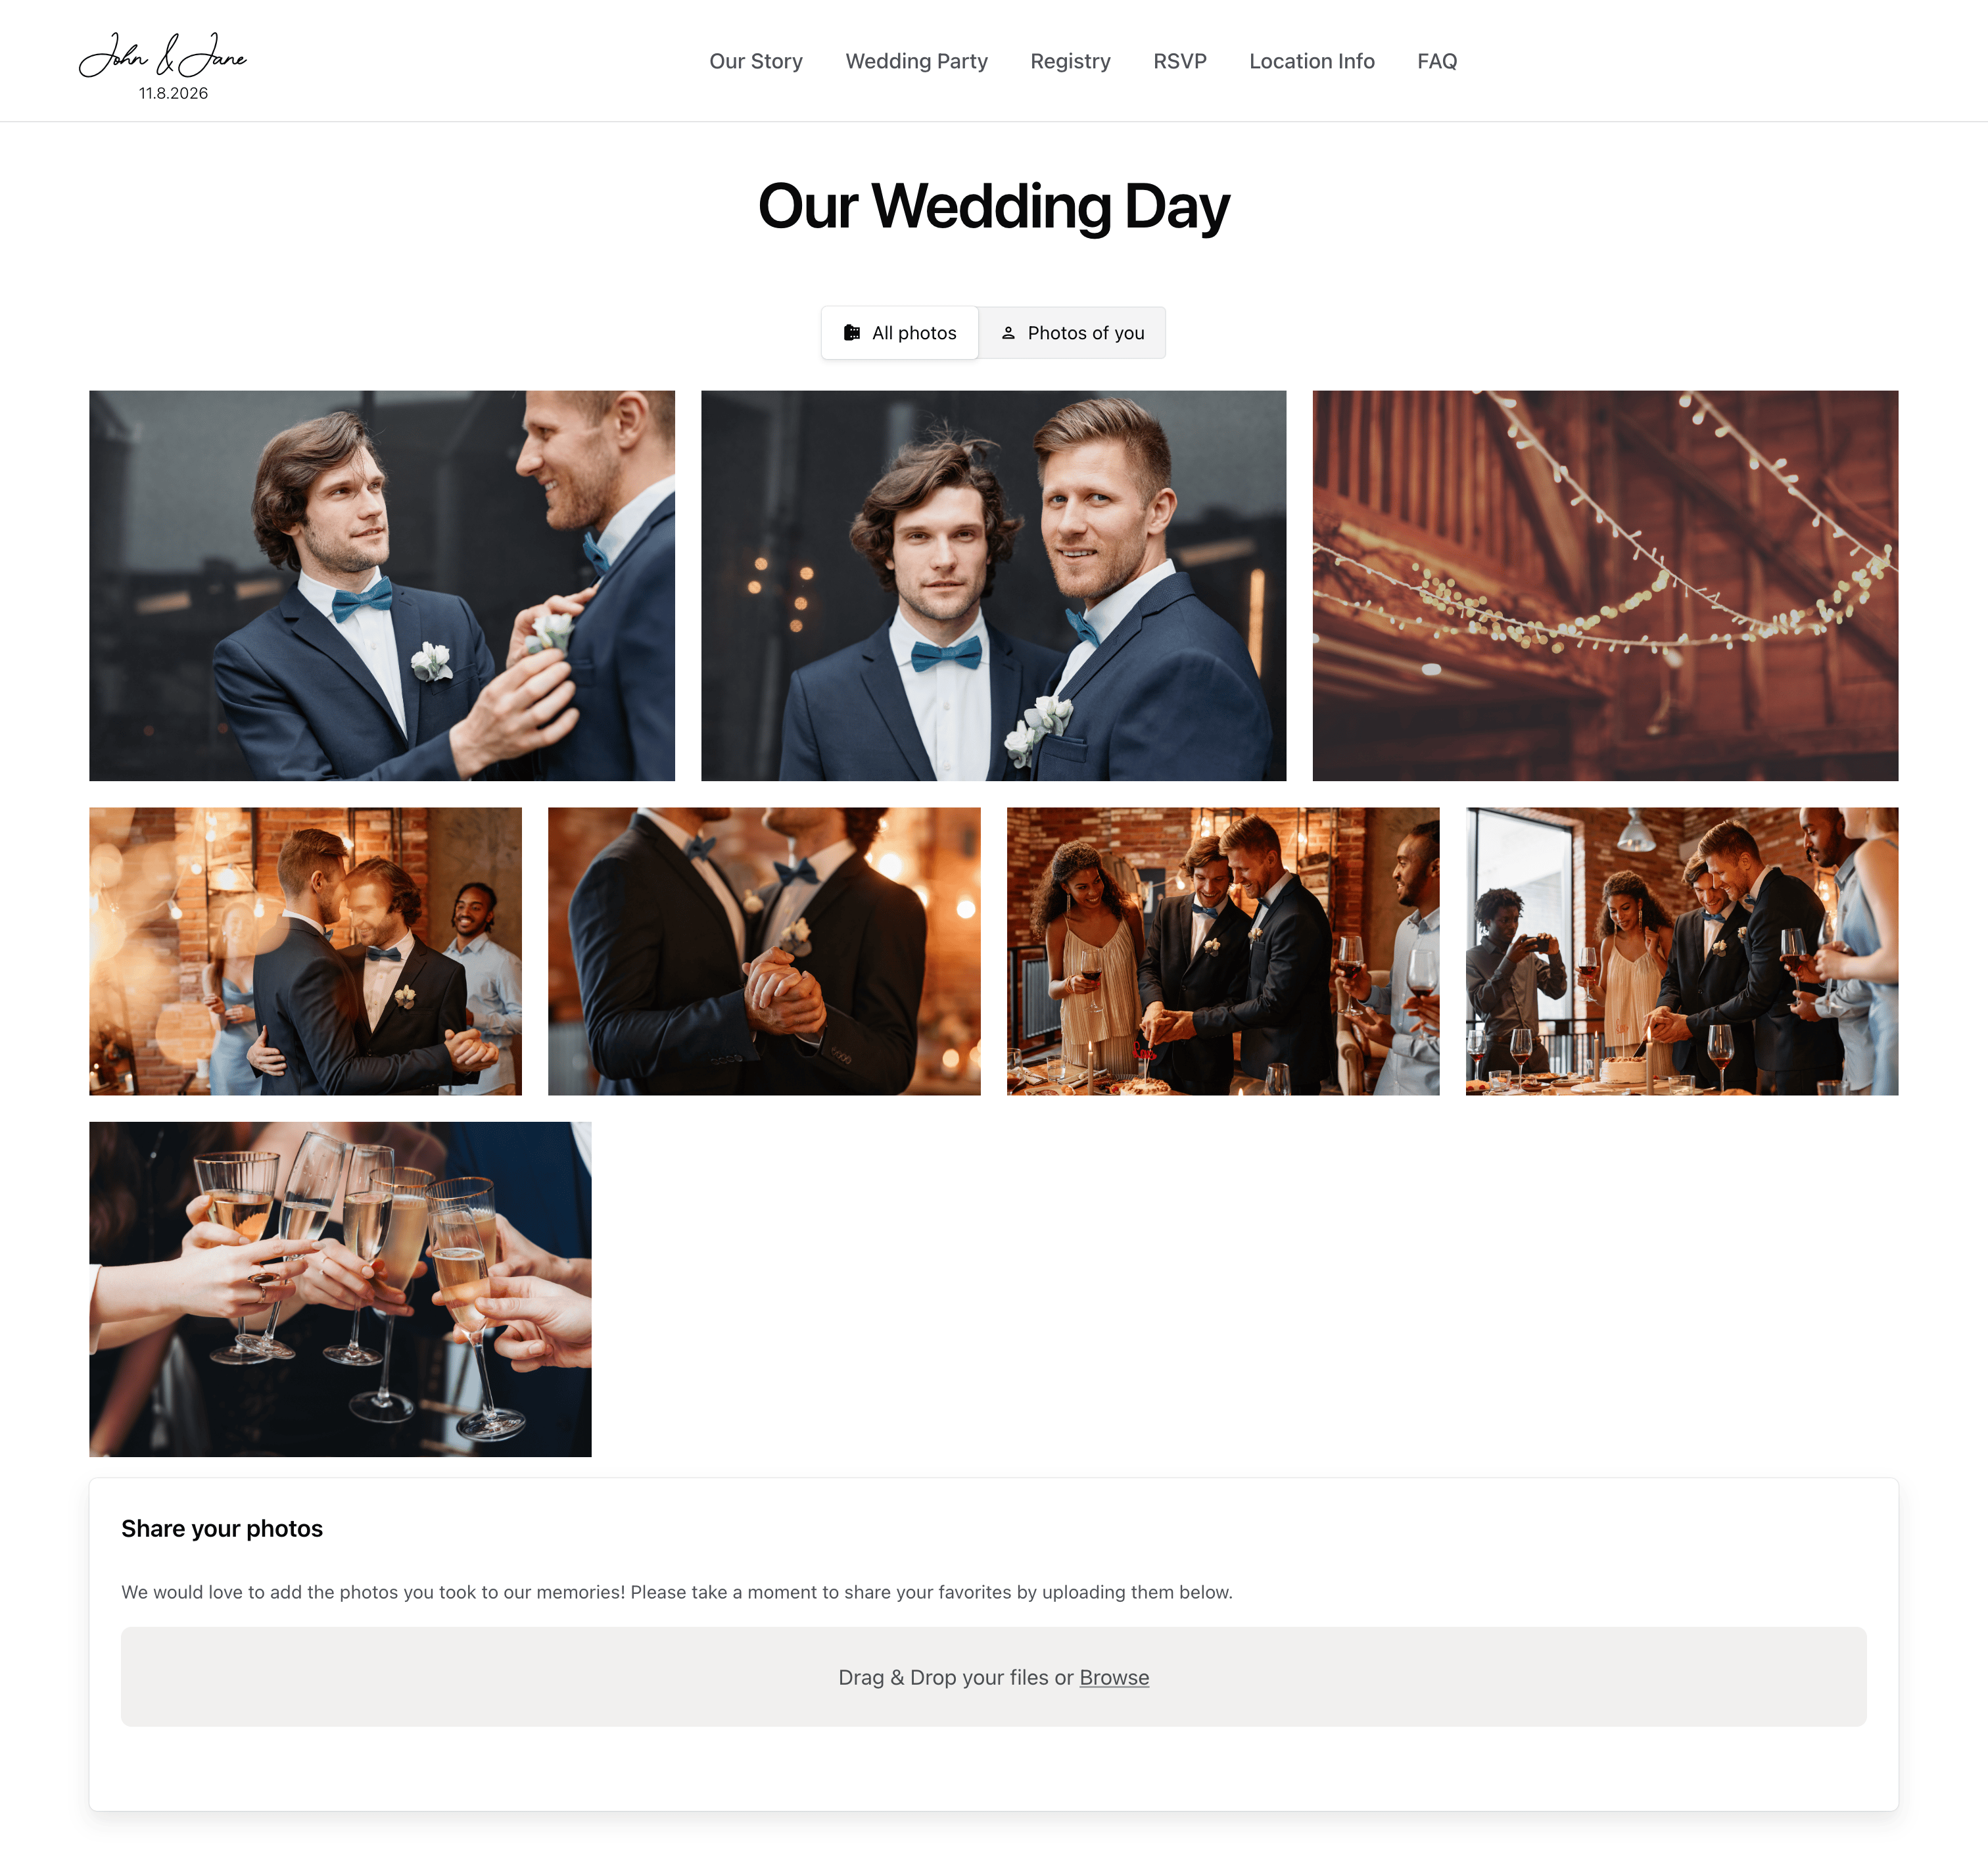
After our incredible wedding went off without a (serious) hitch, we jumped on a plane for our honeymoon, and then returned to reality, I felt a growing hole in my heart. I really loved building this website, and I am so proud of how it turned out. Working on something so personal gives me a reason to care deeply about the small details, which is something I love to do. I came up with one last opportunity to build something tailored and fun.</p>

<p>
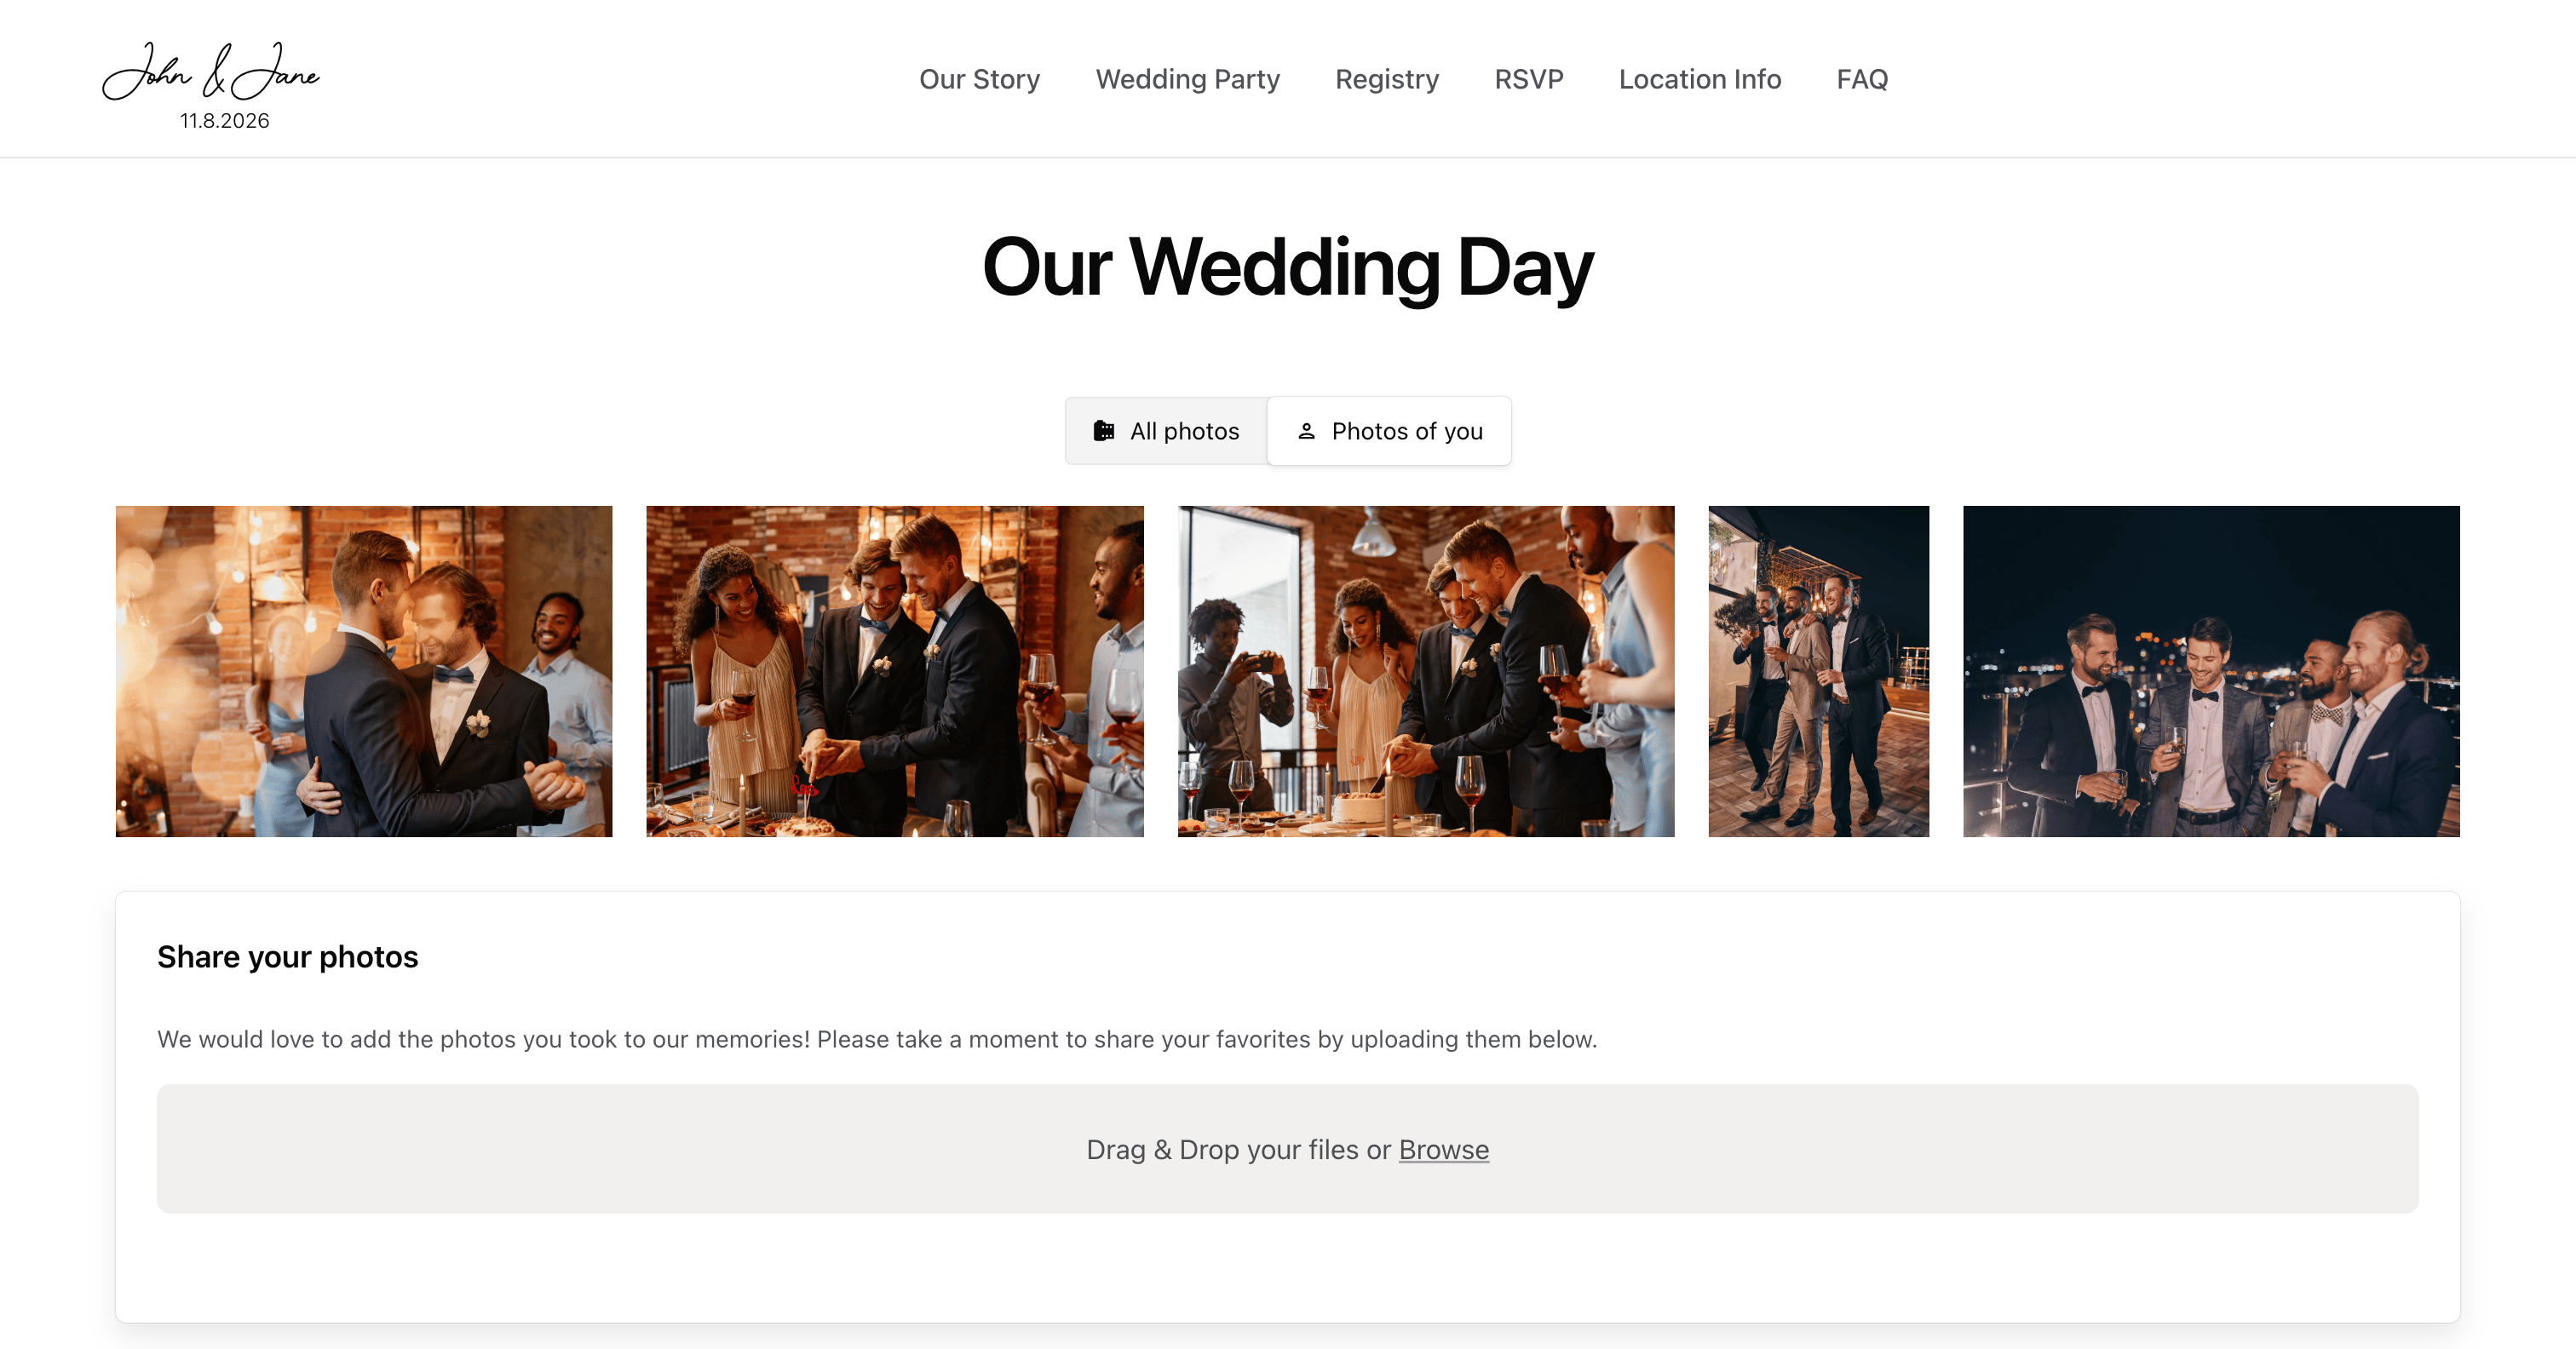
I coded up a rickety but working photo-tagging interface built on <a href="https://yet-another-react-lightbox.com">Yet Another React Lightbox</a> and <a href="https://react-photo-album.com">React Photo Album</a> that could be used to tag the photos we got back from our photographer to the invitations in Dynamo. I experimented with using facial recognition libraries to accelerate this process, but found that it was just unreliable enough that its result would require a manual review anyways, and it missed some people who were obvious to us as humans who remembered what people were wearing and who was together. My plan was to allow people to filter photos on the website to just the ones with them in it, so I wasn’t okay with any false-positives or misses of really good photos of them that just happened not to get auto-tagged. My wife and I put on a terrible reality TV show (Love is Blind…) got through tagging each of the 1,000+ photos before the season was over.</p>

<p>As a result of this work, I was able to replace our home page with a nice photo gallery experience that we sent back out to our guests so that they could relive the memories, and also have the opportunity to upload and share their own with us:</p>

<div class="gallery">
  <div class="gallery-item">
    <a href="/assets/img/wedding/album-all.png" data-lightbox="album-gallery">
      <img src="/assets/img/wedding/album-all.cropped.png" alt="The homepage of the website once authenticated, shows a photo of the couple and a countdown timer to the wedding day." />
    </a>
    <div class="desc">The whole photo album</div>
  </div>
  <div class="gallery-item">
    <a href="/assets/img/wedding/album-tagged.png" data-lightbox="album-gallery">
      <img src="/assets/img/wedding/album-tagged.png" alt="The 'Location' page of the website, shows information about the venue, the wedding day schedule, transportation and lodging options, and things to do while in town." />
    </a>
    <div class="desc">A separate section for just the tagged photos of the guest</div>
  </div>
</div>

<h2 id="in-conclusion">In Conclusion</h2>

<p>Out of everything I did, there was really only one mistake in hindsight – I should have asked for people’s email addresses when RSVPing. We had their street addresses, obviously, but no way to easily communicate any reminders or updates to our guests who indicated they would be attending. Luckily this didn’t end up being too big of an issue, but if I were doing this over again I would absolutely fix that and require an email address from everyone who indicated they were coming.</p>

<p>I <strong>really</strong> had fun with this project and am sad that it’s now come to an end. I wrote this post as much to brag about all the work I put into this as to prolong the end of this story just a bit longer.</p>

<p>As silly as it may seem, this is what software engineering is all about to me – I love being able to bring just about any experience I can think of in my head to fruition, and have an impact on my life and others’. I love all the complexity and intentional decisions that sometimes underlies something that seems so simple and works well. I also am a firm believer that anything worth doing is worth overdoing, especially when it comes to something so meaningful and personal as my wedding.</p>

<p>And although it may seem like I spent an exorbitant amount of time on this project in the midst of such an important time for planning (and I did), I am also a believer in balance, and in sharing the load. Throughout this process my wife and I planned our wedding as a team while playing to our strengths – sometimes that involved me leaving some website ideas on the cutting room floor and making sure the actually-important things were done first. But I feel thankful that my partner saw how much joy this brought me and supported me 100% in this mostly completely unnecessary exercise in overdoing something.</p>

<div class="center">
    <img class="tall-image" src="/assets/img/wedding/wedding-pic.jpg" alt="A photo of our doggy at the wedding :)" />
</div>]]></content><author><name></name></author><summary type="html"><![CDATA[My partner and I recently got married! We feel incredibly grateful that everything went nearly perfectly, and we are really enjoying this new chapter in our lives together.]]></summary></entry></feed>